Showing posts with label on. Show all posts

How To Install Android KitKat On Your PC

Monday, May 26, 2014

      When we talk about Android, what’s the first thing that comes to your mind? I bet 99% of the people will answer smartphones or tablets (unless there’s an app that you’re crazy about and that’s what you prefer). However, Android, being the open source platform that it is, offers much more flexibility in terms of the hardware that it can run on, and so there’s Android out there that can run just fine on x86 computer architecture as well. Yup – full-blown Android running natively, not the likes of BlueStacks! In this post, we’ll show you exactly how to get that.
Before we begin, let’s take a look at what Android on a PC is all about. Dubbed Android-x86, it’s (an) unofficial build(s) of Google’s operating system designed specifically to work with Intel’s x86 hardware architecture. That’s something that Android on Intel project gives you anyway, which is available for the likes of Dell XPS12. However, Android-x86 takes that one step further by extending support for a number of other hardware manufacturers as well. It, too, supports the latest Android 4.4 KitKat, and is quite easy to set up.

Please note that you choose to follow these instructions at your own risk. Redmond Pie will not be responsible for any potential damage to your hardware as a result of following this guide.
Prerequisites
  • Android x86 ISO (please download the most appropriate version)
  • USB Flash drive (you may use a bootable CD/DVD as well)
  • Free hard disk space on the computer/laptop that you want to install Android on:
    • For Froyo – ICS, 2GB
    • For Jelly Bean 4.2 and 4.3, 8GB
    • For KitKat 4.4.2, 10GB
  • UNetbootin (for creating bootable USB thumb drive) which you can grab from:unetbootin.sourceforge.net
Procedure
Step 1: Download the version of Android-x86 ISO that’s appropriate for your hardware, and UNetbootin.
Step 2: Create a bootable USB drive using UNetbootin and the ISO image that you downloaded earlier. Simply click on the Diskimage button as shown in the screenshot below and point it towards the ISO you downloaded in step 1.
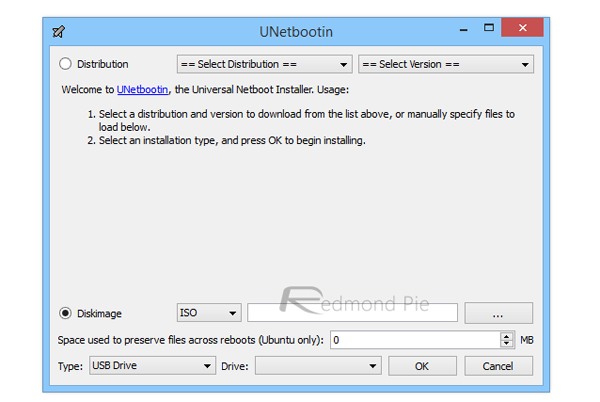

Step 3: Reboot your computer using the USB drive as the source. You might need to change a couple of settings under your system’s BIOS to do that, although most modern systems already default to USB drive if it’s available.
Step 4: In the menu that appears, choose Install Android x86 to hard disk.
Step 5: Choose which partition to install Android x86 on. If you’re using a new partition for that, it’s better to format it at this point.
Step 6: A few prompts will appear pertaining to installation of GRUB Bootloader. Make sure you allow this.
Step 7: Now, another prompt will ask you to make system /r/w. Hit Yes on this as well, especially if you’d like to modify your Android x86 installation later.
Step 8: If you’re installing ICS or earlier, you will get another prompt to install virtual SD card. Use 1800 MB for space, as that’s the maximum supported.
Step 9: Reboot your PC.
That’s all there is to it. Since this will be a multiboot setup, you can choose to either boot to Windows or Android per your liking.


Source :- redmondpie 


Read more ...

The Top Android Apps On Google Play Store..

Saturday, May 24, 2014
This is an updated list of the top Android Apps that have amassed more than 50,000,000 downloads on the official Google Play store. The data has been screen-scraped from Google Web Search and the Google Play store. You can also download the raw data as an Excel sheet.
                                Click to zoom

Legend: The blue bars indicate the average user rating of an app while orange reflects the total number of users that have rated that app on the App Store.

App Install Base: 500 million to 1 billion

  1. Gmail
  2. YouTube
  3. Google Play services
  4. Maps
  5. Facebook

App Install Base: 100 million - 500 million

  1. GO Launcher EX
  2. Twitter
  3. Viber
  4. Facebook Messenger
  5. Voice Search
  6. Google Play Books
  7. Subway Surfers
  8. Google Play Music
  9. Tiny Flashlight + LED
  10. Pandora
  11. WhatsApp Messenger
  12. Skype
  13. Fruit Ninja Free
  14. Dropbox
  15. Adobe Reader
  16. Angry Birds
  17. Talking Tom Cat 2 Free
  18. Street View on Google Maps
  19. Google+
  20. Hangouts (replaces Talk)
  21. Google Search
  22. Chrome Browser
  23. Google Play Movies & TV
  24. LINE: Free Calls & Messages

App Install Base: 50 million - 100 million

  1. GO SMS Pro
  2. KakaoTalk: Free Calls & Text
  3. Google Translate
  4. Temple Run
  5. SoundHound
  6. Tango Video, Voice & Text
  7. Yahoo! Mail
  8. Brightest Flashlight Free ®
  9. Advanced Task Killer
  10. GO Locker
  11. Pou
  12. Angry Birds Rio
  13. Hill Climb Racing
  14. Barcode Scanner
  15. WeChat
  16. TuneIn Radio
  17. MX Player
  18. PicsArt
  19. Shoot Bubble Deluxe
  20. Despicable Me
  21. Talking Tom Cat Free
  22. GROUP PLAY
  23. Shazam
  24. ChatON
  25. Kindle
  26. ZEDGE.
  27. Jetpack Joyride
  28. Google Play Magazines
  29. AntiVirus Security
  30. Pool Billiards Pro
  31. Opera Mini web browser
  32. Google Earth
  33. Flipboard: Your News Magazine
  34. Angry Birds Space
  35. Angry Birds Seasons
  36. Angry Birds Star Wars

Quick highlights:

  • Facebook is only non-Google app in the Google Play Store that has been downloaded more than 500 million times. The others are Gmail, YouTube, Google Play and Google Maps that are mostly pre-installed on Android phones.
  • The 50m+ list has 65 apps but the one app that enjoys the highest average user rating is Brightest Flashlight, a free app that turns your Android phone into a torch.
  • Facebook has been rated by over 8 million users while 4 million Android users have added their ratings for WhatsApps Messenger on the Play Store. No other app comes close.

                                              Click to zoom

Source :- labnol
Read more ...

Add Search Shortcuts on your Android or iPhone

Friday, May 23, 2014
How do you search a popular website, say Twitter or YouTube, on your mobile phone? You would launch the browser, open the corresponding website and then use the search box inside that site. Or you would use the mobile app, if you have installed one.

There’s an alternate way as well. You may consider installing search shortcuts on the home screen of your mobile phone and they will help you perform searches on your favorite website with fewer steps.
Search your favorite websites with a tap

Let’s dive right into an example.

Open the Safari browser on your iPhone (or iPad) and click here to open the search shortcut for Wolfram Alpha. A pop-up dialog will open but since we are installing the shortcut, hit the Cancel button to close that dialog. Now tap the Share icon in Safari and choose “Add to Home Screen” to add that search shortcut to your home screen.

The next time you want to search Wolfram on your phone, tap the Wolfram shortcut available on your home screen, enter the search terms and it will take you directly to the search results on the Wolfram website. That’s just one tap.

You can similarly add search shortcuts on your Android device using the newer version of Chrome browser. Open any of the search shortcuts listed below, “cancel” the pop-up dialog and then choose the “Add to homescreen” option under the main menu to place a shortcut on your homescreen for quick access.

Search Shortcuts for Android and iOS

Here are some ready-to-install search shortcuts for some popular websites that you may add to the homescreen of your Android or iOS device.


A search shortcut is essentially a little piece of JavaScript, much like a bookmarklet, that accepts input through a pop-up dialog and redirects the user to the search results page.
Writing one is easy. For instance, here’s the code for the Google I’m Feeling Lucky shortcut that automatically transports you to the first search result (useful when you don’t remember the exact URL of a site).
  1. <!-- Page Title -->
  2. <title>Feeling Lucky</title>
  3.  
  4. <!-- Touch Icon - This will show up on the home screen -->
  5. <link rel="apple-touch-icon" href="lucky.png" />
  6.  
  7. <script>
  8. var u = "http://www.google.com/";
  9. <!-- Show the input dialog -->
  10. var q = window.prompt('What are you looking for?','');
  11. if(q) {
  12. /* If the user has entered input, redirect to search results */
  13. u = u + "/search?&btnI=I%27m+Feeling+Lucky&q=" + escape(q);
  14. window.location.href = u;
  15. } else {
  16. /* If the user hits cancel, show helper text and do nothing */
  17. document.write("Add me to your home screen");
  18. }
  19. </script>

All you need to know is the URL of the search results page and use it in line #13.

Source :- labnol 
Read more ...

Quick Tip: The Correct Way to Create Curved Text

Thursday, May 22, 2014
Insignias and retro logos are popular and many of them have some sort of text along a curved path. Most people use the Text Warp tool but it ends up deforming the text. In this tutorial, you’ll learn why they look deformed and how you can properly create text along a curve without deforming the letters.


Why Curved Text Looks Deformed

Have a look at the two badges below – the one on the left was curved with the Warp Text tool while the other was created on a curved path. At first glance, they both look the same but look closely at the text and you can see that the left-image text is deformed (letters upper-half are enlarged).


Here’s another example with just plain text to better show how the text gets deformed.


Don’t use the Warp Text tool

First of all, never create curved text with the Warp Text tool. This tool can be found in the options bar when you have your Text tool selected and it can be quick and easy, but the results are amateur. The Warp Text tool should only be used for warping the shape of your text such as making it bulge, pinched, etc.


How to Create Text on a Curved Path

The proper way is to create a vector path then add your text to the path. We’ll show you how.

Step 1

First, select the Ellipse tool from your toolbar. You can pick any shape you like or use the Pen tool (P) to draw your own path that your text will follow. For our image, the Ellipse tool is the most suitable choice.


Step 2

In the options bar located below your Photoshop menu, click on the dropdown menu and select Path.


Draw a path on your document. You can hold the Shift key while dragging to get a perfect circle (or square/polygon if you are using another shape tool).


To reposition the path, switch to the Path Selection tool and drag the path.


Step 3

Next, switch to the Text tool (T) then click anywhere on the path. When you hover over the path, your cursor should change to a text cursor with a curved line across it.


Type in your text. If you want your text centered, remember to set it in the options bar.


Step 4

We have our text, but it’s not quite aligned. First, to position the text in the center, you can adjust the start and stop points. On the path, you’ll find two points. Switch to the Path Selection Tool then drag the point to reposition your text. Your cursor should change to a text cursor with two arrows. As you’re dragging, you can hold the Shift key if you want to position the points perfectly in the center.


Step 5It appears that our text path is too large and the text isn’t centered with the badge. To fix this, you can resize the path using the Transform tool. Press Ctrl/Cmd+T or go to Edit > Free Transform. While holding the Shift and Alt keys, drag the corner nodes of the transform box towards the center to scale the path. When you hold the Alt and Shift key, it forces your transformation to transform from the center and in the same aspect ratio. Press Enter to apply the changes

Our text is now in the center
.

Additional Text Settings

Here are more ways you can creatively create text along a path.
----------------------------------------------------------------------------------------------------------------------------------

Flip Text Along a Path

With the Point Selection tool selected, simply drag the point towards the center of the shape to inverse the text.


------------------------------------------------------------------------------------------------------------


Change Text Orientation


With the Text tool selected, click on the button in your options bar.


Final Results


Note on the Badges

Do you like the badges shown in this tutorial? These amazing badges were designed by Zeppelin Graphics – purchase them on Creative Market.  And case you’re wondering, yes the text is created on a vector path (no warped text) :).. 
All over. 
Source :-  Photoshop Tutorials


Read more ...

How to Move your Blogger Blog on Custom Domain to WordPress

Friday, May 16, 2014
sarah has setup a blog on Blogger with a custom domain name but as her website is gaining traction, she is planning to make the switch from Blogger to WordPress. Her blog has a few hundred blog posts, images, comments and she wants to port everything to WordPress.
While the WordPress blogging platform does offer tools for quickly and easily importing content (including images) from a Blogspot blog, her biggest worry is about losing Google search traffic. Will the site continue to rank well in Google once it moves from Blogger to WordPress? Can she retain her existing RSS feed and newsletter subscribers after the switch?

Move from Blogger (Custom Domain) to WordPress


Well the good news is that if you are using a custom domain with your Blogger blog, you can very easily switch to WordPress and your search engine rankings won’t be affected. That’s because WordPress allows you to have the same URLs for your migrated blog posts and thus the move across platforms would be transparent to search bots and your existing blog subscribers.
This tutorial discusses moving a Blogger blog on custom domain to WordPress. If your blog has a blogspot.com address, please see this video tutorial.

1. Remove Blogger Redirection

Your blogspot blog is currently redirecting to a custom web domain name and the first thing we need to do is remove this redirection. Go to your Blogger dashboard at blogger.com, choose your Blog and choose Settings under Publishing. Here click Edit, uncheck the Redirect option and save  your changes.


2. Update the domain’s DNS records

When you associated a custom domain with your Blogger blog, you must have added a couple of CNAME records to the DNS settings of your domain. Since we are now moving to a self-hosted version of WordPress, these Google records need to be removed from the DNS.

Go to your domain registrar’s website and locate the DNS settings in the control panel. Here remove the CNAME records that point to ghs.google.com and *.googlehosted.com. You may also want to remove the various A-records that point to Google IPs like 216.239.32.21, 216.239.34.21 and so on.

Next you need to change the A record of your domain to point to the IP address of your web host. Wait for some time (maybe an hour) as DNS changes propagate across the Internet.

3. Install WordPress on the Domain


Most web hosting providers offer a simple option for installing WordPress on your domain or sub-domain from the domain’s control panel itself. If that is not the case, you may download the WordPress installer from WordPress.org, upload it to the root folder through FTP and unzip the file. See this guide on Installing WordPress for more details.

4. Import Blogger Content into WordPress

Open your WordPress Admin dashboard, choose Blogger under Tools -> Import and install the Blogger Importer plugin. Once the plugin is installed, choose Activate Plugin & Run Importer. Authorize WordPress to access your Blogger Account and click Import against the blogspot.com blog that you wish to move to WordPress.

WordPress will now start fetching your Blogger blog posts, images and comments. If the importer get stuck, you can refresh the page and it will resume from where it left off. The import process may take a while depending on the size of your Blogger website.

5. Update the WordPress Permalinks

Once the stuff has migrated, we need to change the default permalink structure of WordPress that the blog posts retain the same URL as they had on Blogger. Go to Settings -> Permalink Settings and paste the following in the Custom Structure input box. Save your changes.


/%year%/%monthnum%/%postname%.html
It is not the most optimized permalink structure but necessary for retaining your existing Google traffic (SEO).

6. Redirect the RSS Feeds

Open the .htaccess file in the root folder of your WordPress blog and copy-paste the following snippet before everything else. We are essentially instructing WordPress to redirect all request made to your Blogger RSS feeds to the new feeds of WordPress. This redirect will be transparent to you existing RSS feed subscribers.

<IfModule mod_rewrite.c>
 RewriteEngine on
 RewriteRule atom.xml /feed? [L,R=301]
 RewriteRule rss.xml /feed? [L,R=301]
 RewriteRule ^feeds/posts/?.*$ /feed? [L,R=301]
 RewriteRule ^feeds/comments/?.*$ /comments/feed? [L,R=301]
</IfModule>

If the .htaccess file does not existing in the WordPress folder of your server, you can easily create one using Vim or any text editor

Blogger to WordPress — The Next Steps


Now that your Blogger blog has been moved to WordPress, you can get rid of the old blogspot.com site since it is essentially a duplicate copy of your new WordPress site.

Instead of deleting the old blog, we can make it Private so that it stays invisible to everyone but you. Go to Settings under your Blogger dashboard, choose Blog Readers and choose Private – Only Blog Authors. Search engine bots and human visitors to your old blog will then not be able to read any posts.

Source:http:labnol.org
Read more ...