Learn some new tricks for your Android smartphone with our tips on maps, storage, data plans and more.
With Jelly Bean, you can quickly and easily review the photos on your device. From the camera app, you likely know to tap the lower right-hand corner to view your most-recent photograph, then swipe left and right to view pictures. For faster review, pinch inward to view pictures lined up in order, similar to a film strip. Swipe up to delete any unwanted photos. Source :- informationweek
Learn some new tricks for your Android smartphone with our tips on maps, storage, data plans and more.
With Android 4.0 (Ice Cream Sandwich) or any newer version, you can decline a phone call while sending the caller a custom text message. This is not a new feature, but the latest OS has different settings. To customize auto-response texts, go to Phone > Settings > Quick Responses. Tap one of the pre-written responses to change it. When your phone rings, you would normally slide the circle to the right to answer the call or to the left to send the caller to voice mail. To send a response text, slide the circle upward to the message icon and let go. From there, you can select a pre-written message or write a new one. Source :-informationweek
Learn some new tricks for your Android smartphone with our tips on maps, storage, data plans and more.
If you have the misfortune of losing your phone, it's unlikely that you'll get it back. Even if someone wants to return it, password protection will keep them from accessing a number to reach you. With Android 4.1, 4.2 and 4.3 (Jelly Bean), you can display your contact information on the lock screen to increase the chances of reuniting with a lost device. From Settings, go toSecurity > Screen security > Owner info. You can enter your name, email address, phone number or other information to appear on the lock screen. Source :- informationweek
Learn some new tricks for your Android smartphone with our tips on maps, storage, data plans and more.
If you have a long name that's difficult to spell or your job uses a lot of obscure terms, you've probably experienced the frustration that comes with typing long or complex words into your device. Next time you're in the middle of typing "Anastasia" or "NoSQL" into your text field, long-press on it. This will add it to the dictionary, so you'll no longer have to type more than the first few characters of the word. Source :- informationweek
Learn some new tricks for your Android smartphone with our tips on maps, storage, data plans and more.
Many of today's devices run on the 4G network. Unfortunately, 4G coverage is often spotty, and using it can quickly drain your phone's battery and put you over your monthly data allowance. You might want to use the 4G network only in a well-covered area, or switch to 3G when you're running low on power. Android makes it easy to do this. To switch networks, simply go toSettings > Mobile networks > Network mode and set your phone to CDMA only (3G) or LTE/CDMA (4G). These settings might vary depending on your location and which network you're on. Source :- informationweek
Throughout the past year, Android skyrocketed in popularity and currently holds 79% of the global smartphone market. When it comes to number of users, Google's operating system trumps even Apple's iOS. Together, Android and iOS make up 93.2% of the global market, but Android's share has been rising while Apple's share dropped. Android's surge contributed to smartphones outselling feature phones globally for the first time in Q2, according to Gartner. What gives Android the current edge? The smartphones are well-known for their customizable interface, which continues to attract new users. You can make the devices your own with apps, games and custom settings. You can also optimize your Android's performance with personalized shortcuts, search boxes and widgets. Many people take personalization to a new level by adding custom words to the Android dictionary, adding contacts' images to the home screen or downloading animated backgrounds for a fun (though battery-draining) touch. Android's many options and features are numerous enough to overwhelm even smartphone veterans. For every feature you know, there is another that can help you do something new with your smartphone. Consider, for example, the Android's ability to run Google Maps offline. With Google Maps for Android, you can select and download a specific area on the map. The downloaded section can be used in places that have limited or unavailable Internet connection and on devices that don't have a data plan. If you don't have an unlimited data plan, using an offline map will save you the cost of accessing Google Maps on a mobile network. To create an offline map, enter Google Maps for Android and display your desired map on the screen. As of July 11, 2013, there is a button that says "Make this map area available offline" to simplify the process. The estimated size of the area in your map will appear on the screen. If it is too large, you will be asked to choose a smaller area. You can store up to six maps on your device. Click through our slideshow to see more things you can learn about your Android smartphone. If you have further suggestions to share with your fellow readers, please add them in the comments section.
You can now use the Google Chrome on your iPad and iPhone to save web pages as high-fidelity PDF documents. The PDFs can also be remotely delivered to your other mobile devices.
Just like the desktop version of Chrome, you can now the Google Chrome browser on your iPad or iPhone to download web pages as PDF files without requiring a separate app. The menu options aren’t very intuitive though so here’s a quick walk-through.
Save web pages as PDFs with Chrome on your iPad and iPhone
Print Web Pages as PDFs with Chrome
While you are inside Google Chrome, tap the Menu button and then choose the Print option. Choose Google Cloud Print and you’ll see a list of all your Android and iOS devices that also have Chrome installed on them. Choose the Save to Google Drive option instead and a PDF version of the current web page will instantly get saved to your Google Drive. Alternatively, you can pick any of your other Android /iOS devices under the Google Cloud Print menu and the PDF file will remotely download to that device. You’ll have to open Chrome on that other device to access the PDF file. If the PDF printing option isn’t working on your iOS device, make sure that you are signed-in with your Google Account and that Chrome to Mobile option is enabled. This is available under Menu -> Settings -> Google Account (your email address) -> Chrome to Mobile. One more thing. It is also possible to save web pages as PDFs directly on your iOS device, bypassing Google Drive, but you can’t export that file into other PDF reading apps like iBooks or even your Mail application. Chrome internally uses the Quartz API of Apple to generate PDF files – the page layout is well preserved but the hyperlinks won’t work inside the PDF.
Say you have found an interesting app in Google’s Android Market that you are quite willing to buy but as the app price is a bit on the expensive side, you would like to use the app and test the various features before loosening your purse strings. Google doesn’t offer “try before you buy” apps but there’s an easy workaround that will help you test any paid app before buying it – you buy an app from the Android market, use it for about 10-12 minutes and then refund the app. The app will be uninstalled from your mobile phone and your account won’t be charged.
How to Refund an Android App
It take a few easy steps to refund an app to the Android Market:
Paid Android Apps – Try before your Buy
Say you have found an interesting app in Google’s Android Market that you are quite willing to buy but as the app price is a bit on the expensive side, you would like to use the app and test the various features before loosening your purse strings. Google doesn’t offer “try before you buy” apps but there’s an easy workaround that will help you test any paid app before buying it – you buy an app from the Android market, use it for about 10-12 minutes and then refund the app. The app will be uninstalled from your mobile phone and your account won’t be charged.
How to Refund an Android App
It take a few easy steps to refund an app to the Android Market:
Step 1: Visit the Google Android Market, either on your desktop or your mobile phone, and buy any of the ‘paid’ apps. Step 2: The app is now installed on your mobile phone. Launch the app and you can test it for the next 10-12 minutes. Step 3. Go back to the Android Market app on your mobile phone and under “My Apps,” tap the app name that you are trying to refund. Hit the “Refund” button and the app will automatically uninstall from your mobile phone. Step 4. Once the App has been uninstalled, it may ask you to specify a reason for removing the app. You can check “I’d rather not say” here and the app amount will be refunded. You’ll also get an email from Google saying:
You have uninstalled the application from your phone. We have cancelled your order and you have not been charged.
The refund process is quite easy and 10 minutes are often enough for you to get a good idea about an app. I tried this with at least two different paid apps and the whole thing worked without a hitch. There are however two things regarding Google’s refund policy that you should know: 1. You only have 15 minutes to return an app to the Android Market from the time of download after which the “refund” option will disappear from the app. 2. You can return an app only once; if you refund an app and purchase it again, you won’t be able to refund it to the Android Market. Source :- labnol
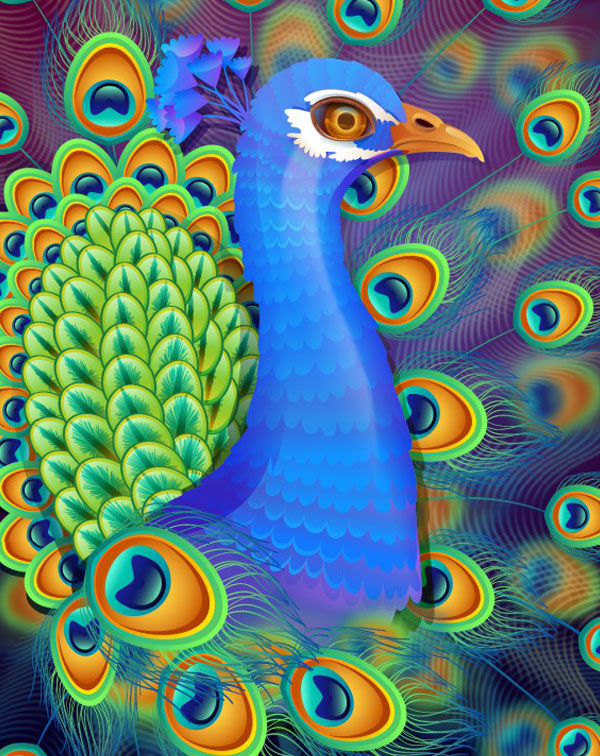
In this tutorial we will get to know one of the most useful Adobe Illustrator features – the Appearance panel – and draw a fabulous colorful peacock with the help of various effects.
The Appearance panel helps us to add as many fills and strokes as we need, applying various effects and arranging them in the necessary order, all applied to one object. Let’s start!
1. Draw a Vivid Eye
Step 1
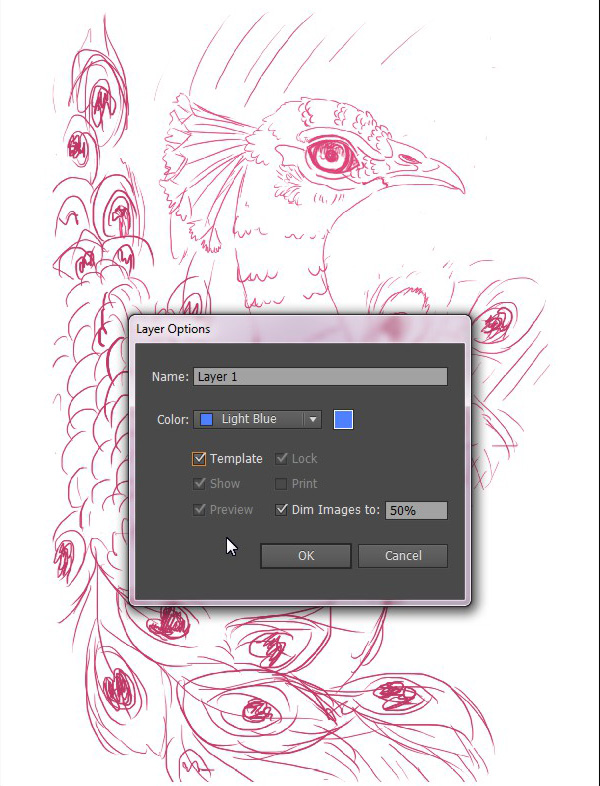
We’ll start from scratch by creating a New Document of 600 x 800px size and File > Place our doodle on the Artboard. Set the Blending Mode of your image to Multiply in order to make the lower objects visible under your sketch.
Double-click on your sketch layer and check the Template box, thus locking the layer and making the sketch more transparent for your convenience.
Step 2
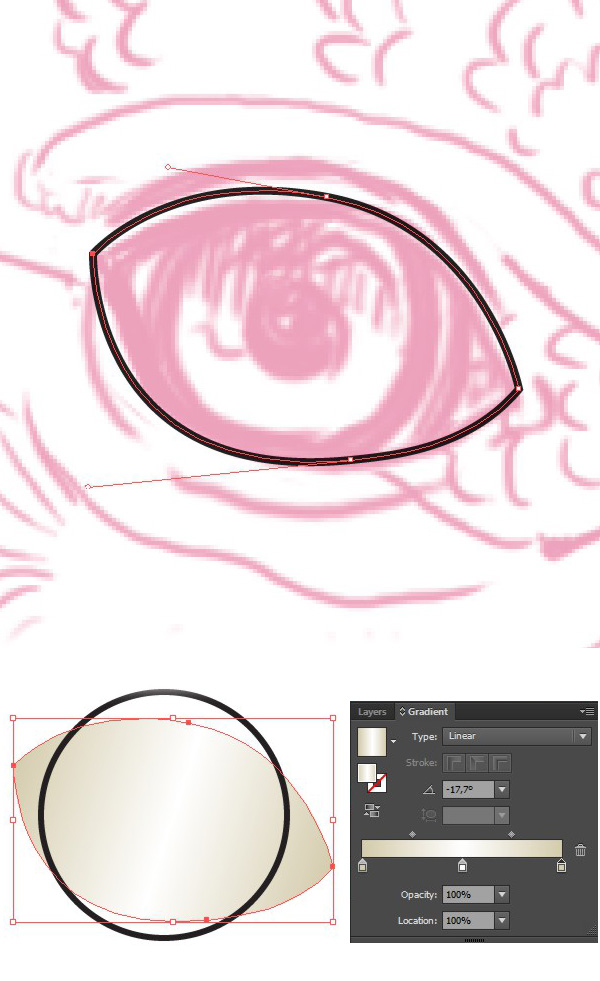
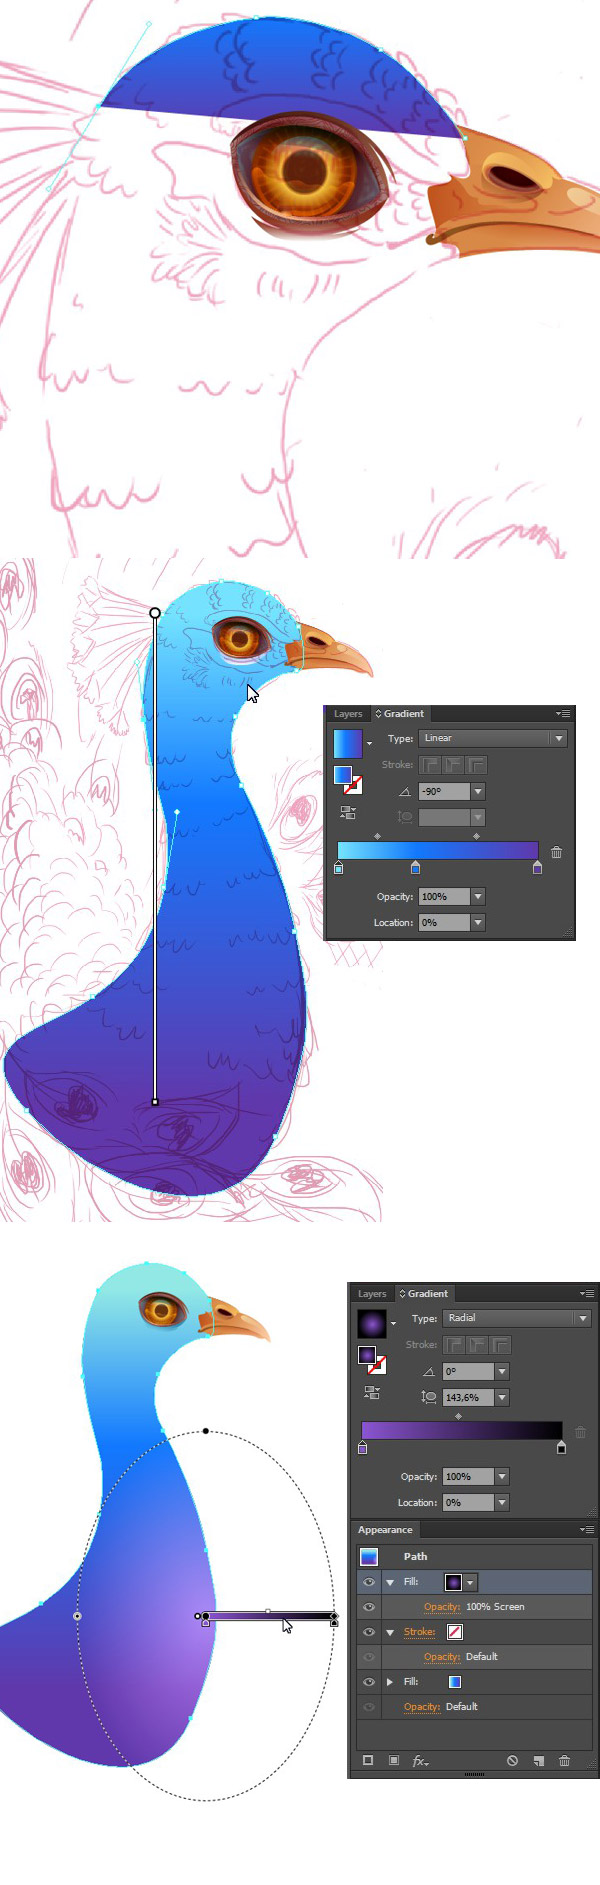
Start by forming the basic eye shape, using the Pen Tool (P) and filling it with a three-colored linear gradient to make in more dimensional.Create the iris base above the eyeball with the help of the Ellipse Tool (L).
Step 3
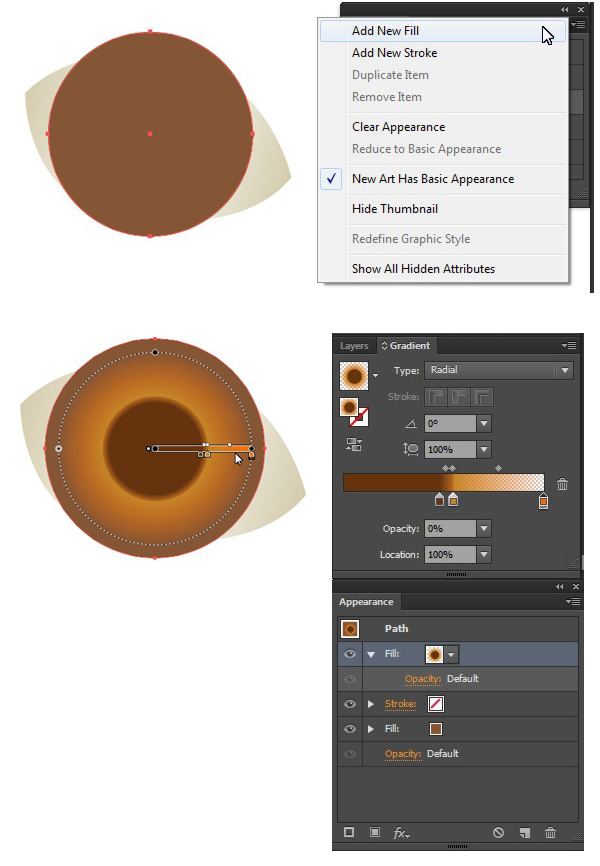
Fill the iris with a chocolate brown color and Add New Fill in the Appearance panel (Window > Appearance). Create a Radial Gradient from brown on one side, yellow in the middle and transparent orange on the other side, as shown on the screenshot, in order to form a pupil in the center of the iris.
Step 4
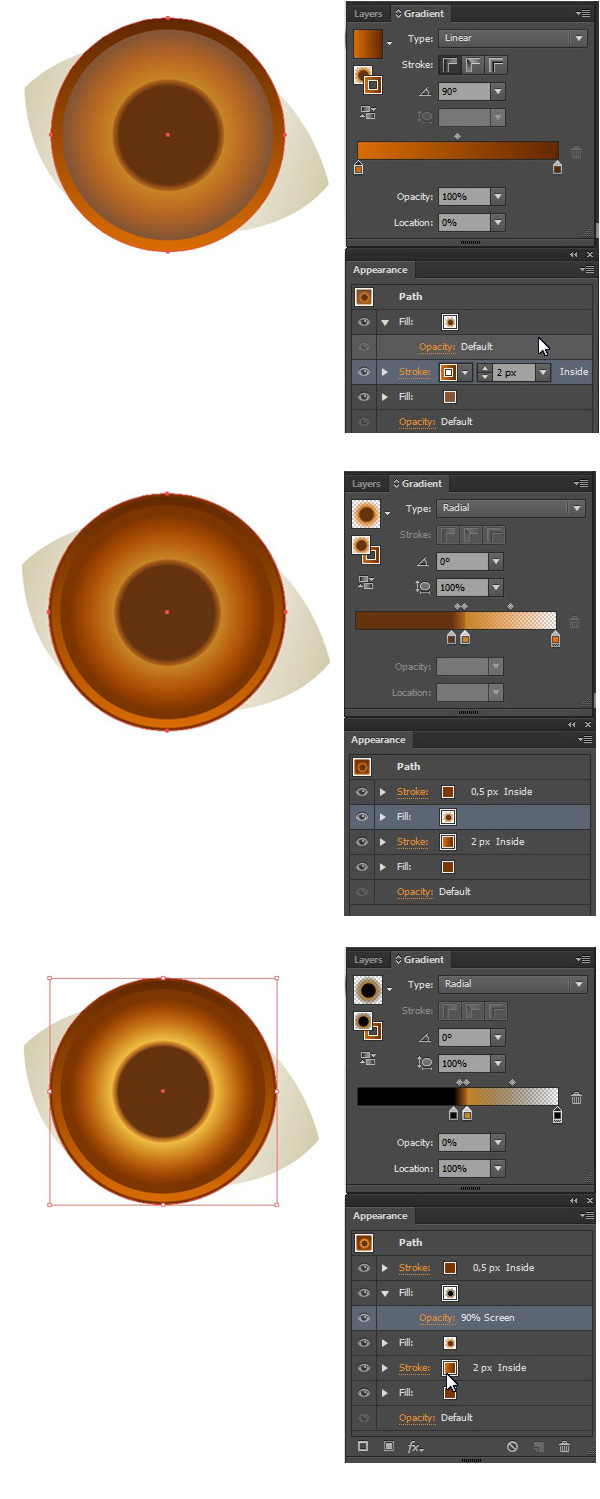
Move on and Add New Stroke of 2px Weight, Align Stroke to Inside inthe Appearance panel. Fill it with a two-colored Linear Gradient from dark-brown to bright orange.
Add another Stroke, setting it's size to 0.5px, filling it with solid brown color and Align Stroke to Inside. Edit the iris fill, adding new gradient with Blending Mode Screen, making the eye brighter.
Step 5
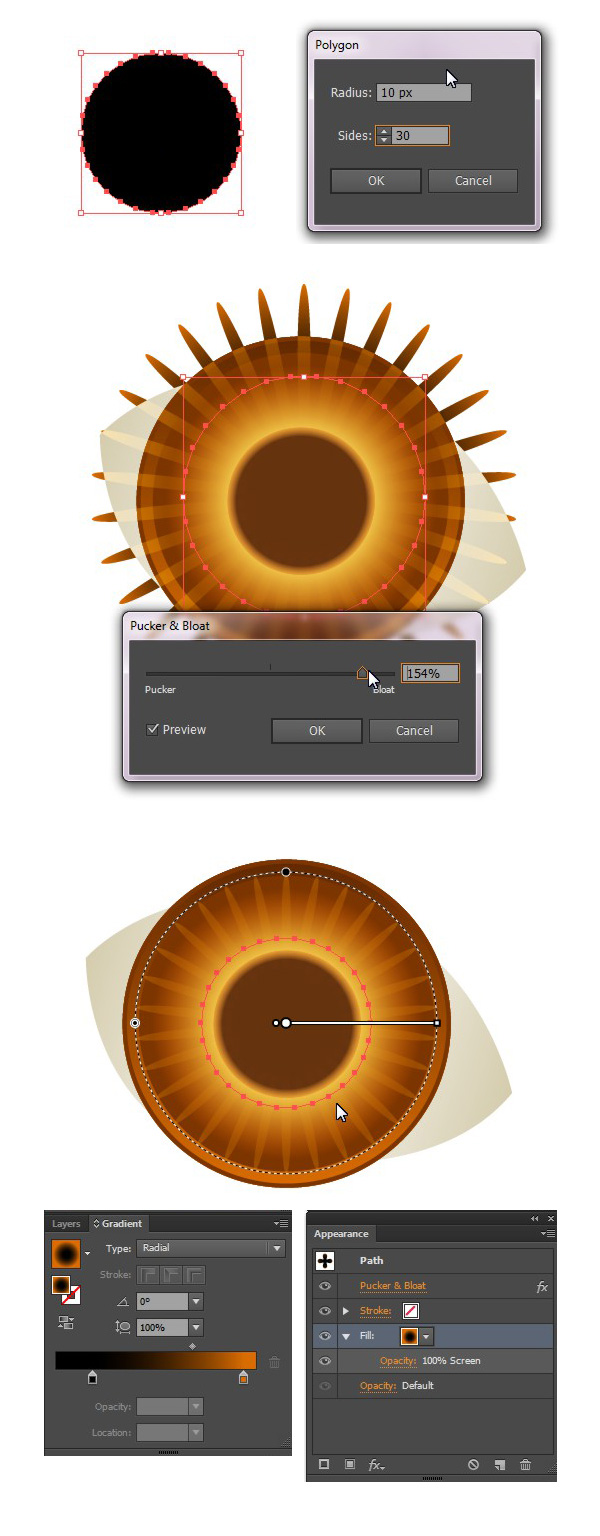
Continue adding details to the eye. Create a 30-sides shape with the Polygon Tool and apply Effect > Distort & Transform > Pucker & Bloat to it, turning our polygon into the sun-like shape. Fill the shape with aLinear Gradient from black to orange and switch it to Blending ModeScreen.
Step 6
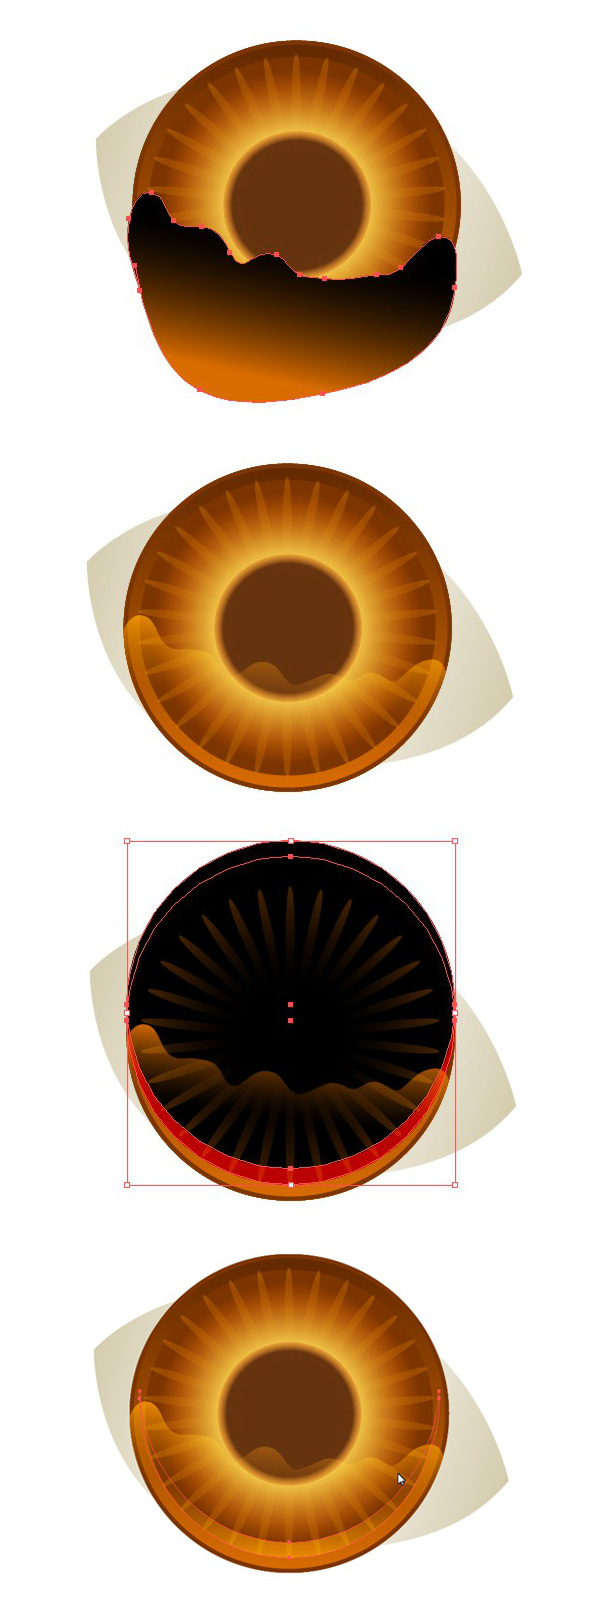
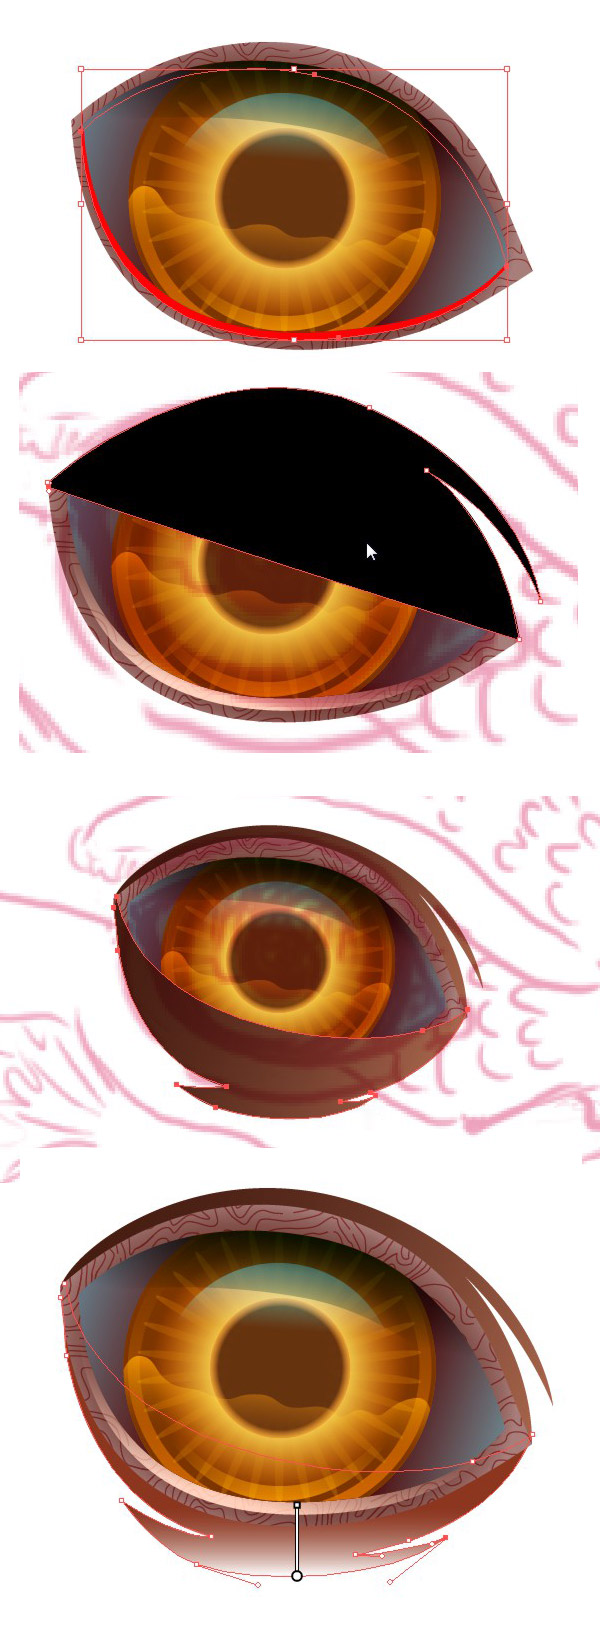
We need to add some reflections to the eye, making it more watered and realistic. Draw a curvy shape with the Pencil Tool (N) and cut off the unneeded part with the help of Shape Builder Tool (Shift-M).
Add a half-moon shape in the bottom of the eye by duplicating the basic circle shape and moving the copy a few pixels up. Delete the unneeded part and use the ScreenBlending Mode to make the reflections half-transparent.
Step 7
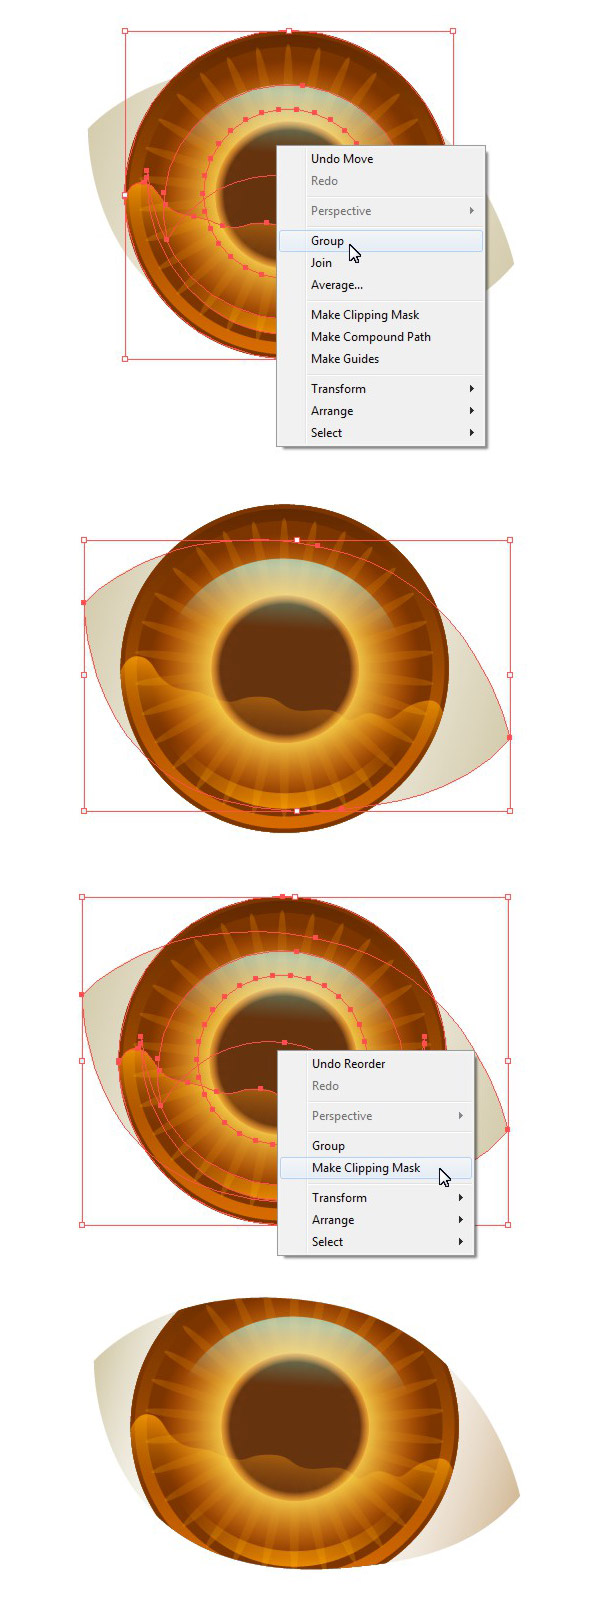
When satisfied with all the details and reflections, group all the iris parts. Duplicate the basic eyeball shape and place the copy above all other objects (Shift-Control-]). Make a Clipping Mask to hide the iris in the eyeball shape.
Step 8
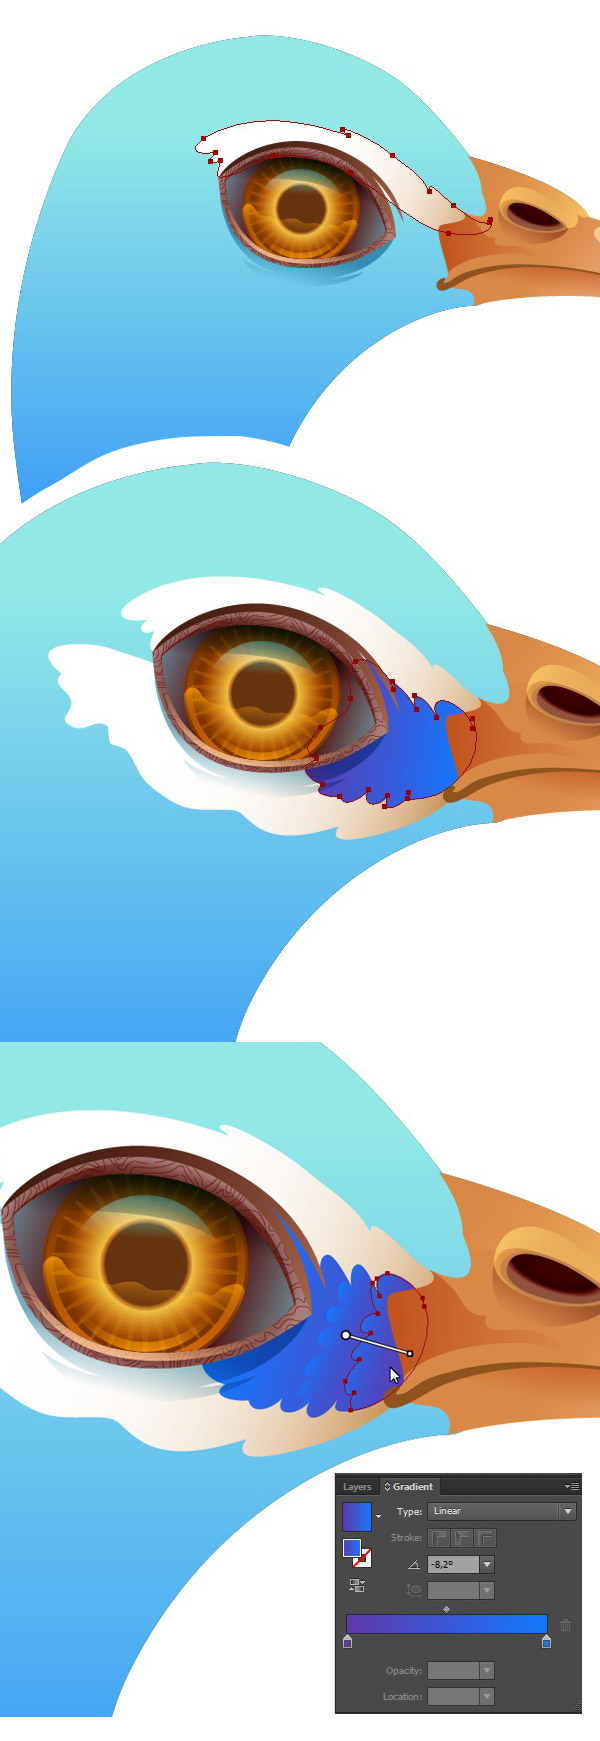
Now let’s add a shadow from the eyelid. We can make it right inside the clipping mask. Duplicate the basic eyeball shape and move one of the copies as shown on the screenshot. Use the Minus Front function in thePathfinder panel to form an arched shadow shape. Fill the newly created shape with a Linear Gradient from brown to white and switch it to Blending Mode Multiply.
Step 9
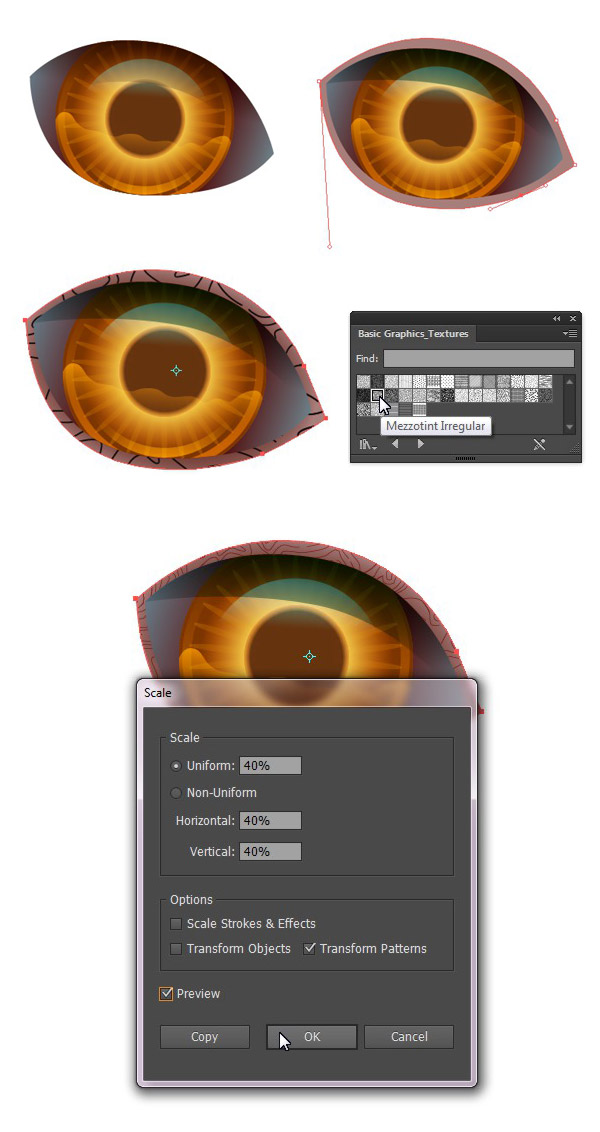
Change the color of the eyeball to make it mysteriously dark and add the eyelid by forming a new shape under the eyeball. Fill it with dark skin-color and apply a default texture from the Swatches panel. You can find it in Swatches Libraries menu > Patterns > Basic Graphics > Basic Graphics_textures.
Change the size of the texture with the help of the Scale Tool (S) by checking the Transform Pattern box in the options and setting the Uniform Scale value to 40%.
Step 10
Add more details to the eyelids by creating simple sharp shapes with the Pencil Tool (N) and using the Blending ModeMultiply in order to blend them nicely with the body.
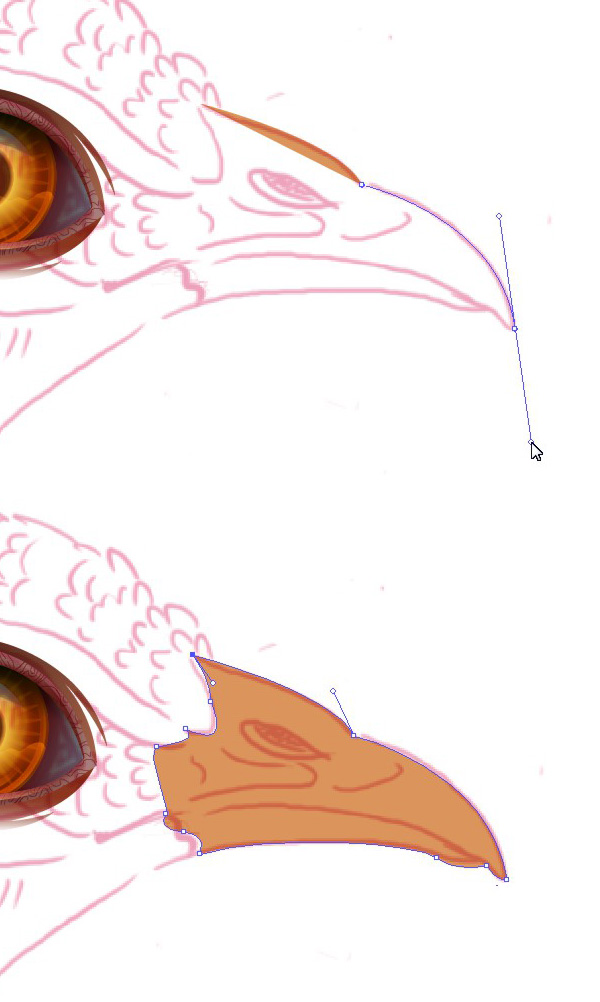
2. Render a Realistic Beak
Step 1
Outline your sketch with the help of the Pen Tool (P) and form a basic beak shape.
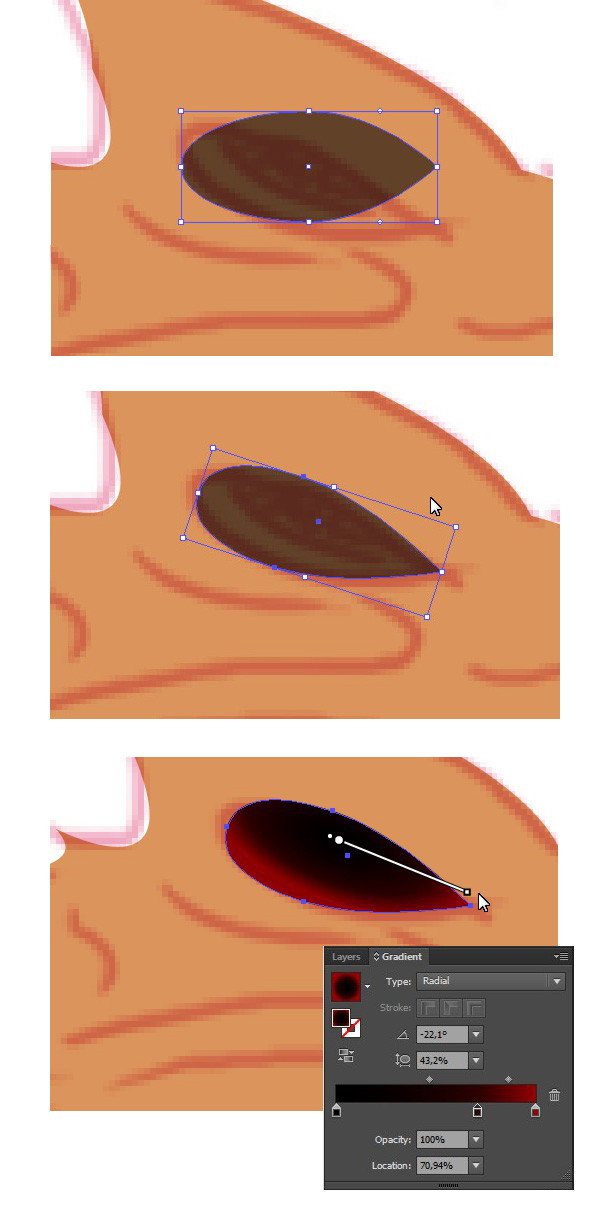
Step 2
Make a simple nostril by forming an ellipse and converting one of its anchor points to angle. Fill the new shape with a Radial Gradient.
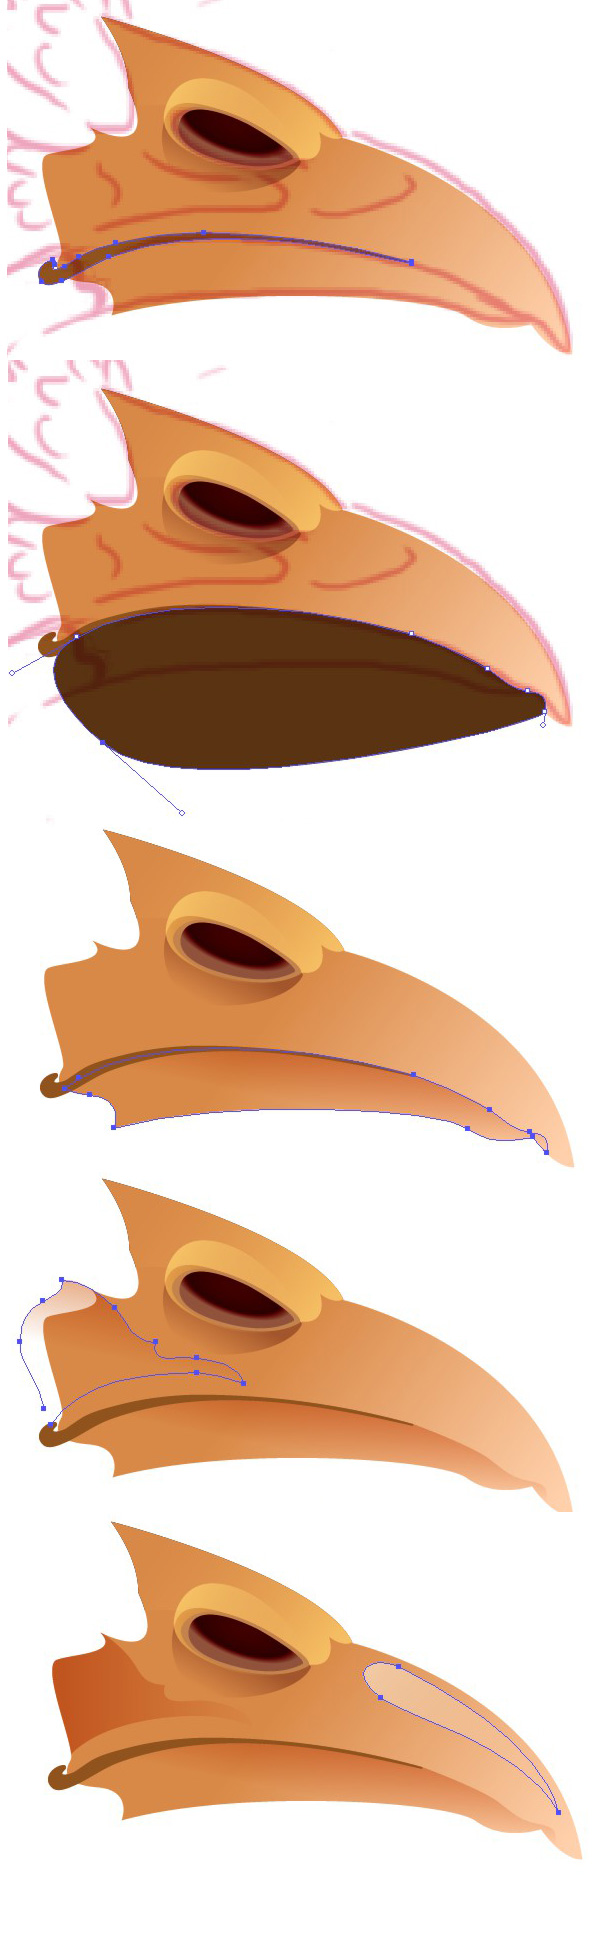
Step 3
Add several shapes for shadows and highlights to sculpt the natural parts of the beak, making it more dimensional and true-to-life.
Step 4
Apply a gentle Linear Gradient to the basic beak shape, making its tip slightly lighter. Use the Blob Brush Tool (Shift-B) to separate the beak into the upper and the lower “jaw” parts. Continue adding shadows, making the lower part darker. Finally, put a light spot on the upper side of the beak, making in more smooth and glossy, as if it reflects the light.
3. Create the Peacock's Head & Body
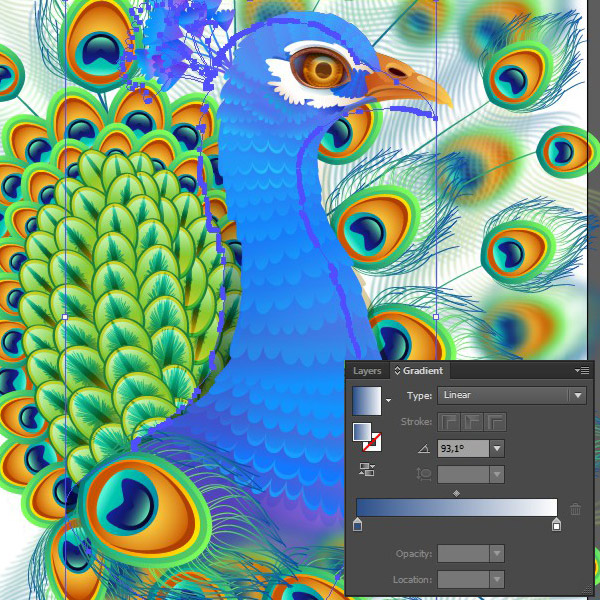
Step 1
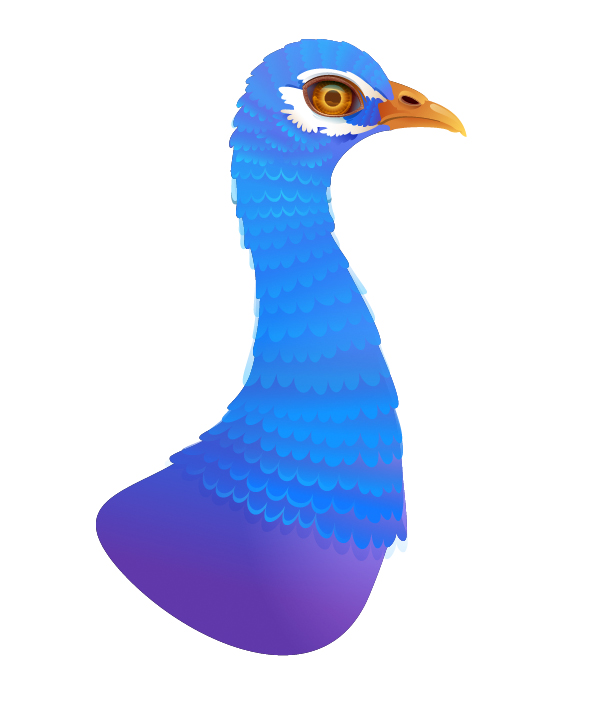
Start tracing your sketch from the peacock’s head and move further to form the basic body-shape. Fill it with a vibrant Linear Gradient from sky-blue on the top to violet in the bottom. Use the Appearance panel to add another fill with a Radial Gradient and put a bright lilac spot on peacock’s chest.
Step 2
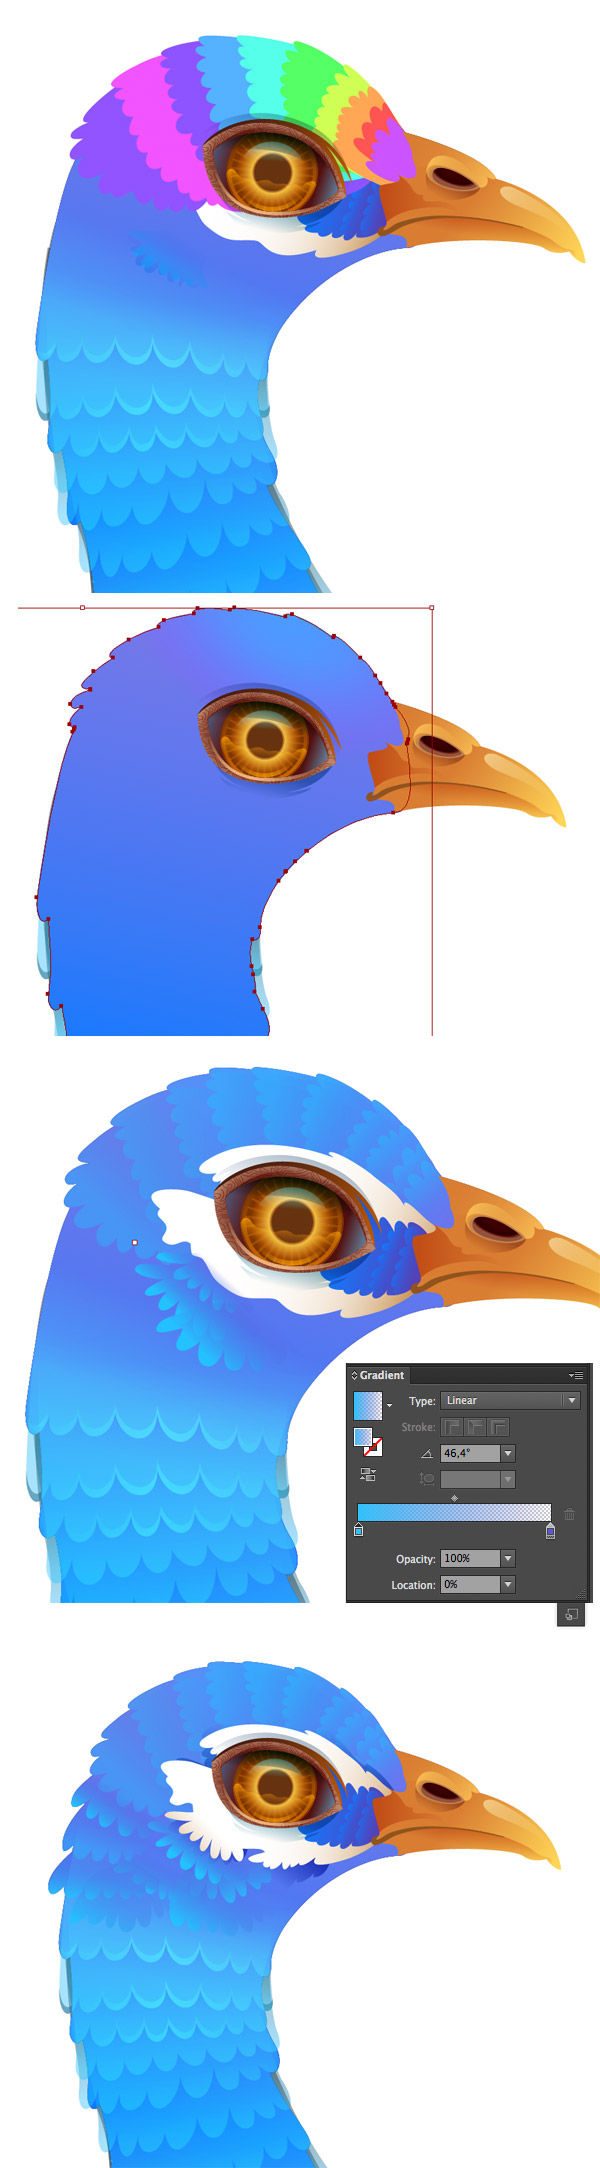
Start adding the distinctive features on the peacock’s head – white plumage around the eye and tiny feathers running from its beak to the inner corner of the eye. Draw each feather group with a simple freehand shape using the Pencil Tool (N) and fill it with Linear Gradient from violet to sparkling blue.
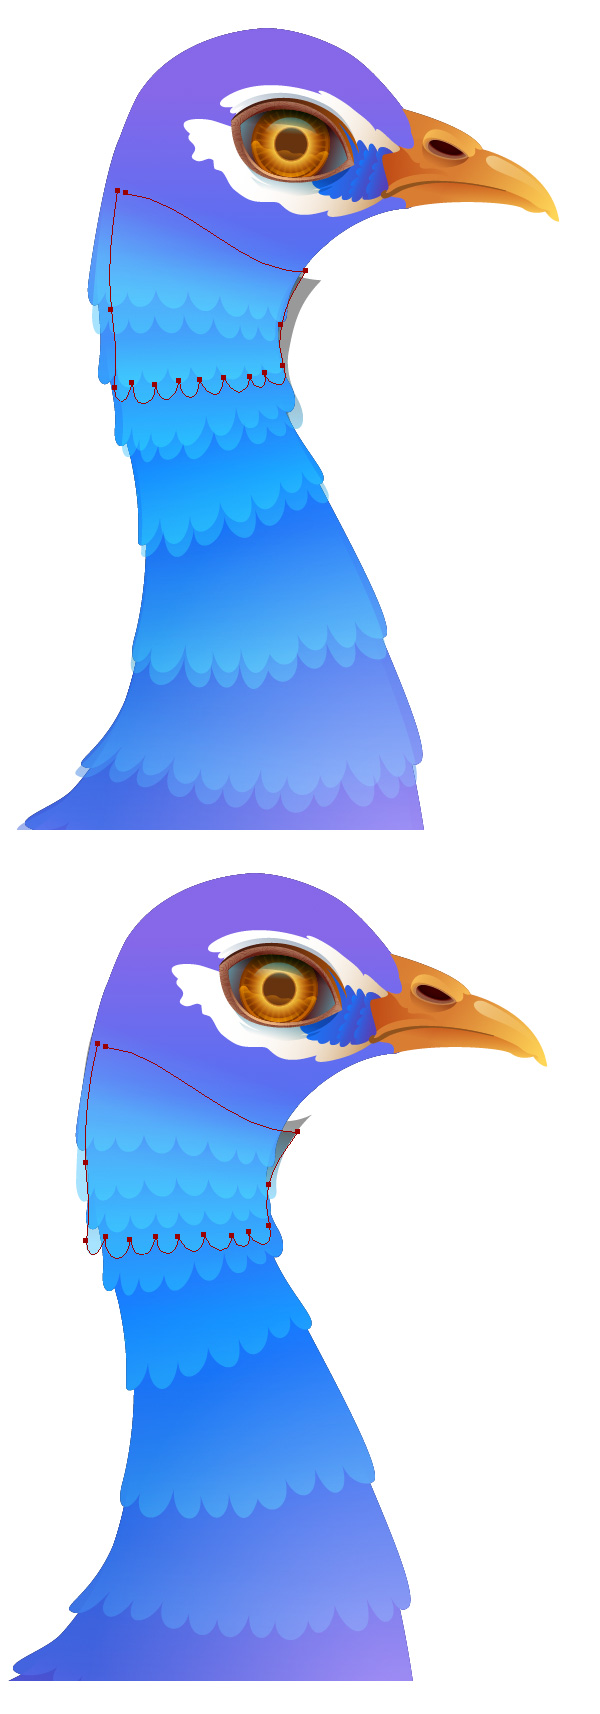
Step 3
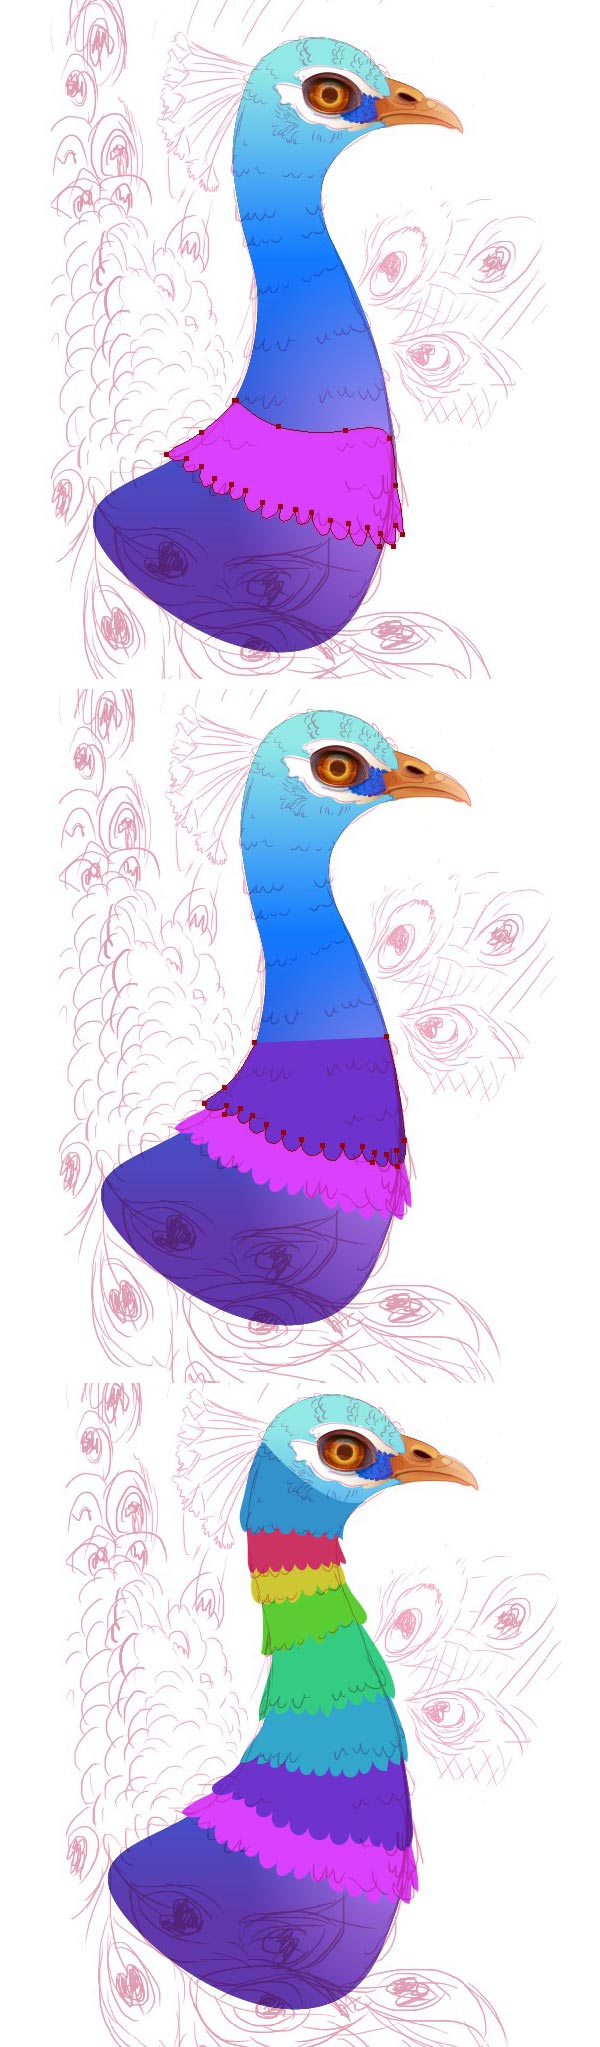
At this step we start adding the feather groups gradually on the peacock’s body. Draw each shape one above the other, imitating the feather layers.
For more clarity, I’ve filled them with various colors on the screenshot in order to separate the layers from each other.
Step 4
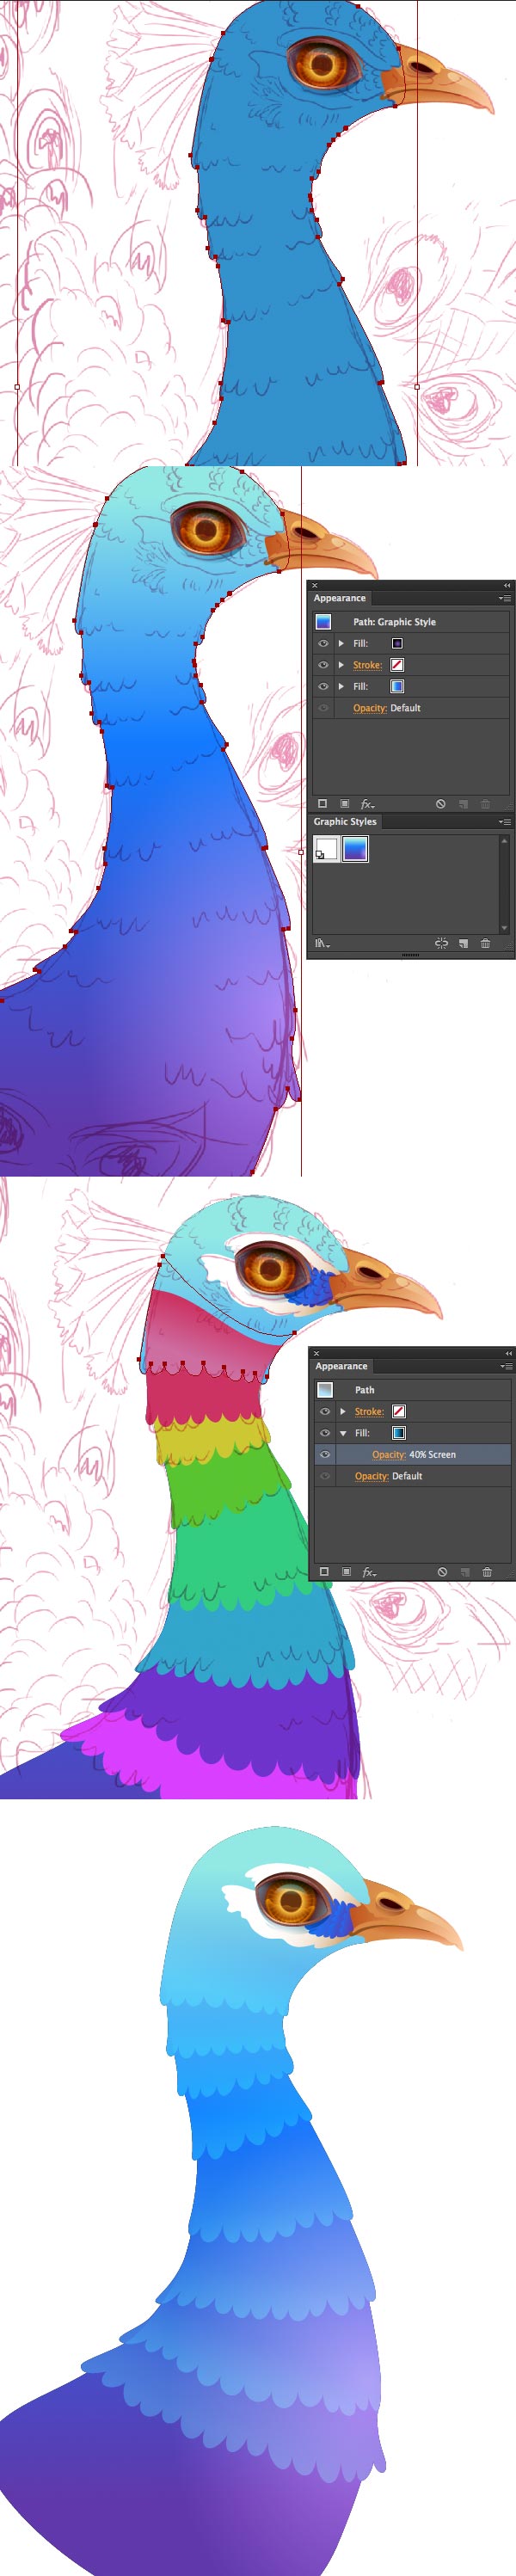
Select the basic body shape and drag it to the Graphic Styles panel. Now you can apply the same appearance to any object! Group all the feather layers and duplicate them. Select both the feather group copy and the basic body shape and Unite them in Pathfinder. If the color has changed, just restore it from the Graphic Styles. Start coloring the feather layers one by one, filling them with a Linear Gradient from blue to black and switching to Blending Mode Screen.
Step 5
Our peacock lacks details now, so let’s add more feathers to make it fluffier! Copy each feather shape and move it by holding the Alt key and dragging it down with the left mouse button. Arrange the feather shapes so that they fit nicely onto the peacock’s neck.
Step 6
Add a few shiny details to the plumage to make the character more radiant and whimsy. Step 7
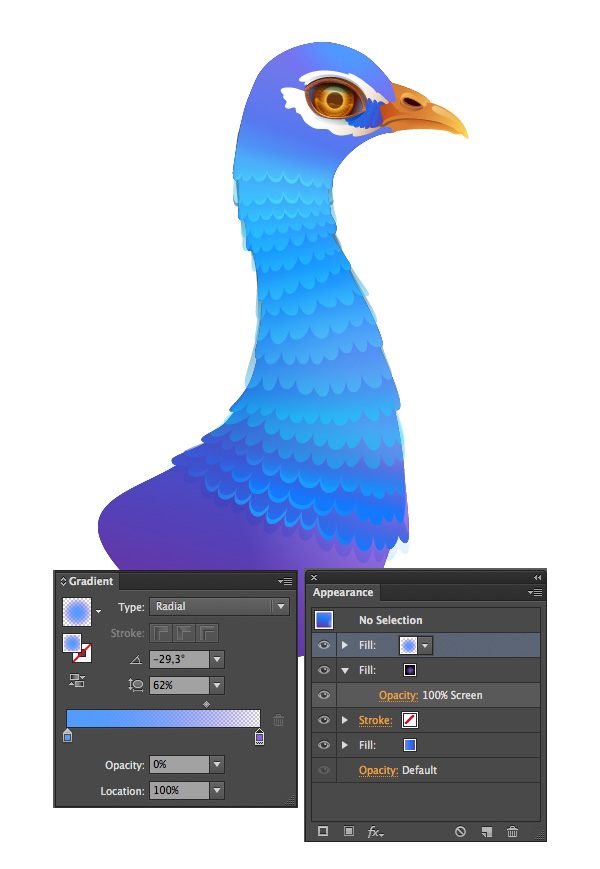
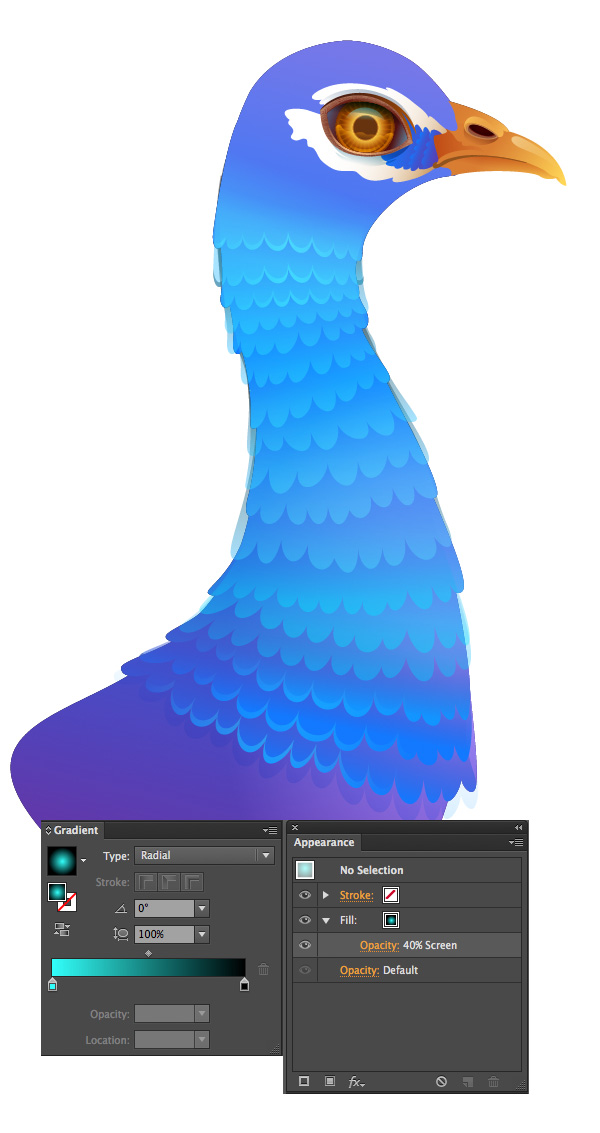
To make the body more solid, let’s add another fill to the feathers with a radial gradient from shiny blue in the middle to transparent violet at the edge. I’ve also modified the body color slightly, adding a blue “cap” on the peacock’s head with the help of the Radial Gradient and the Appearance panel.
Step 8
Decorate the peacock’s head with several layers of feathers, just as we did with its body.
Step 9
This is how our peacock looks like fully feathered! As you can see, we have some transparent feathers left on both sides of the body. But don’t worry about that – just duplicate those layers and Unite them in Pathfinder, as we previously did with the very first feather group.
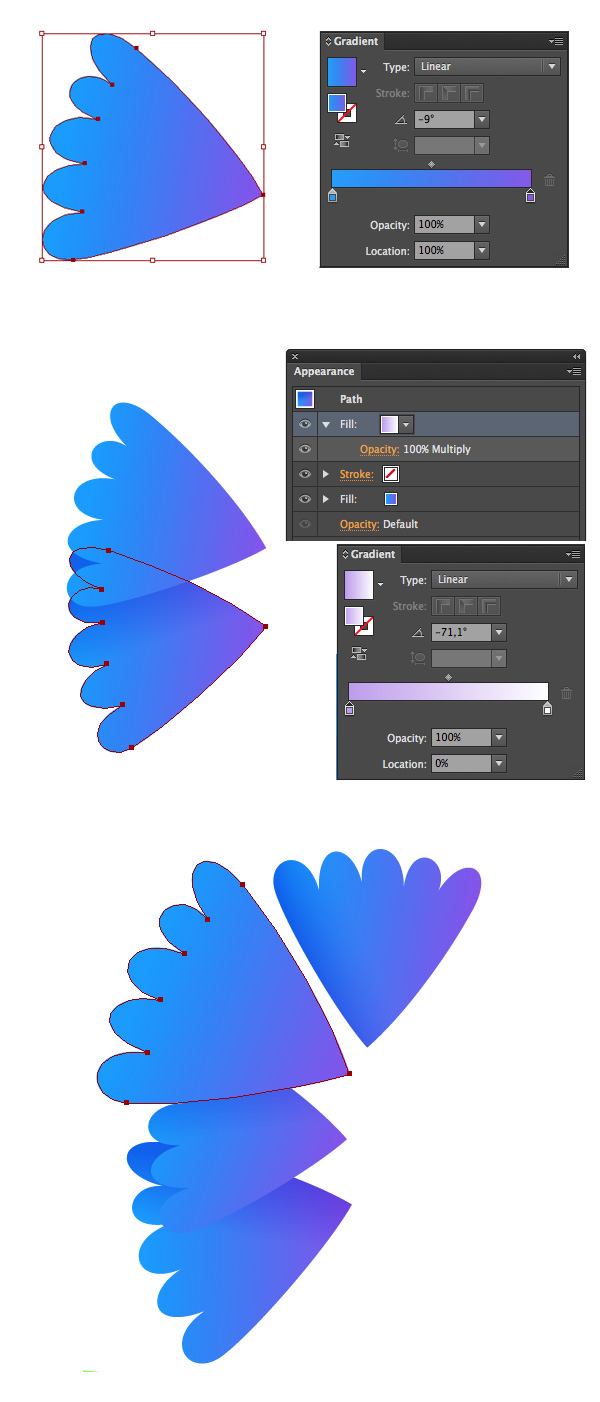
4. Make the Vibrant Tail Plumage
The distinctive feature of every male peacock – is its fantastic festive plumage. We’ll start forming the tail from the smallest group of feathers.
Step 1
First of all, let’s make a single shape and then just use its Graphic Style for all other elements.
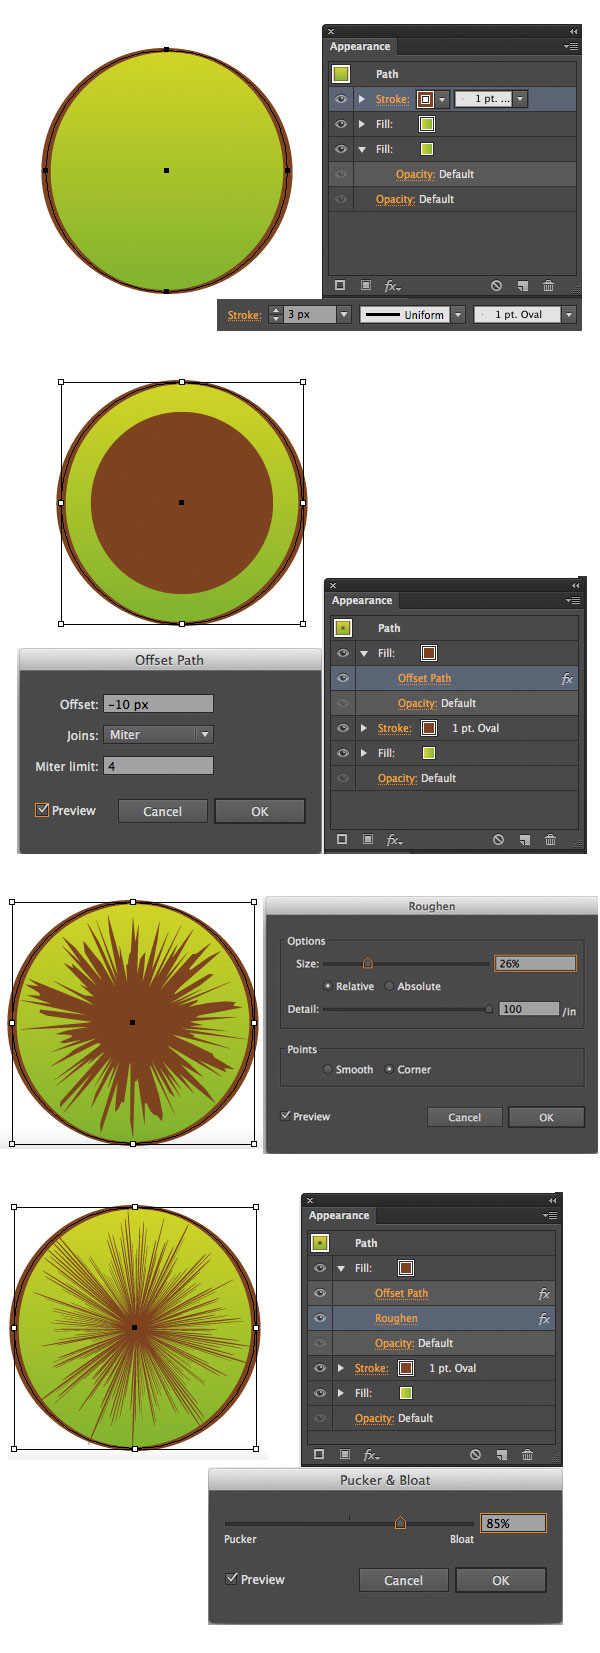
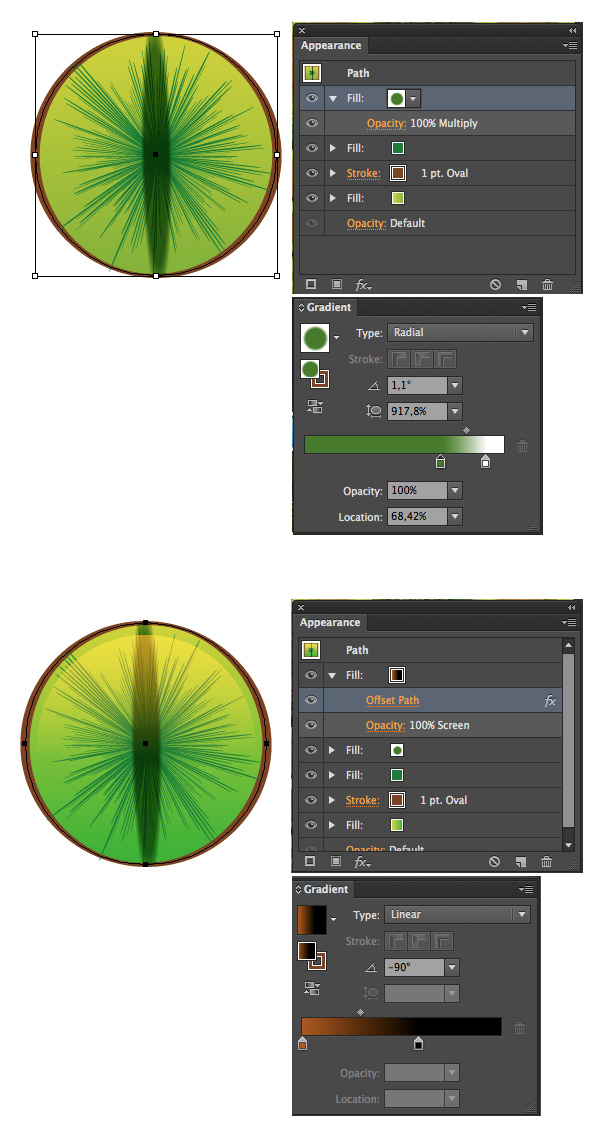
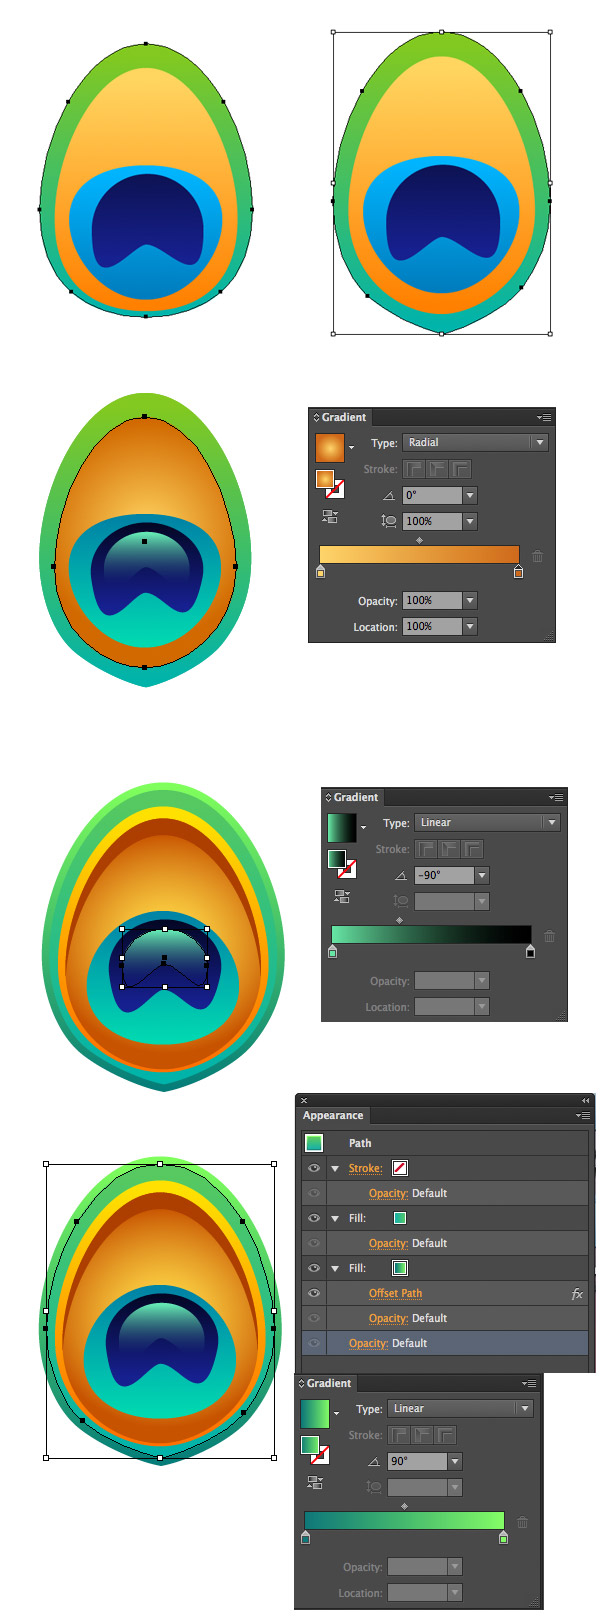
Create a circle using the Ellipse Tool (L) and apply a gradient Fill and brown Stroke to it in the Appearance panel. Set theStroke Weight to 3px and choose 1pt. Oval brush in the Brushes panel to make our stroke more natural. Add New Fill of same color as the stroke. Select the Fill and go to FX > Path > Offset Path in the Appearance panel. Set the Offset Value to -10px and move to FX > Distort & Transform > Roughen to give our feather a nice “hairy” effect. Set the Size to 26% and the Detail value to 100 in the Roughen Options menu. At this step, the shape looks quite torn and messy. To make it more neat and detailed, apply the FX > Distort & Transform > Pucker & Bloat effect to the same fill, setting the bloat value to 85%.
Step 2
The convenience of the Appearance panel is hard to underestimate as it saves a huge amount of time, while you are still working with one and the only object and can easily change colors and effects of any fill or stroke you use.
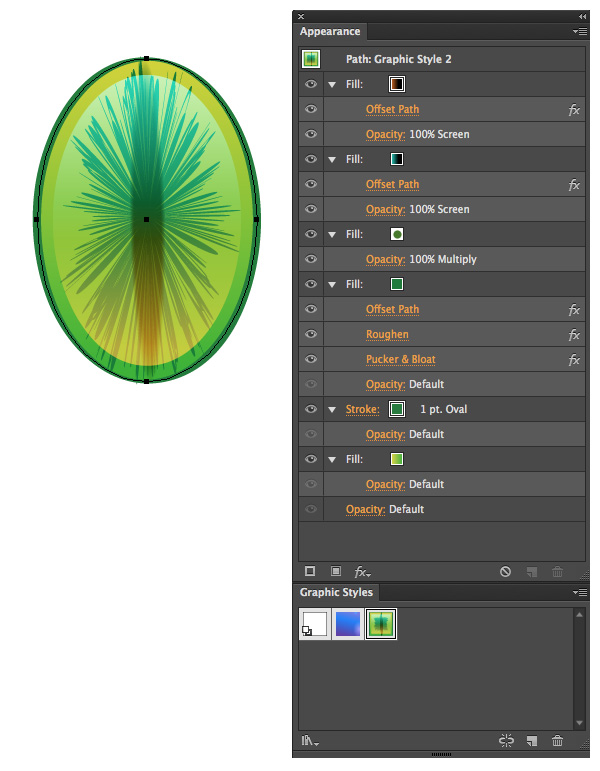
Here I’ve switched the color of the “hairy” part to dark-green and added a new fill with radial gradient from green to white, setting the Blending Mode to Multiply. I’ve squashed the gradient using the Gradient Tool (G)to make it look like the cat’s eye.
Finally, add one more fill and make it slightly smaller with the help of the Offset Path effect. Apply a Linear Gradient from dark-orange to black and switch it to Blending Mode Screen in order to form a glossy highlight effect above our feather.
Step 3
Extrude the shape to make it move oval and check all the details in the Appearance panel. You can easily edit them if some of the effects deform after reshaping the feather.
Step 4
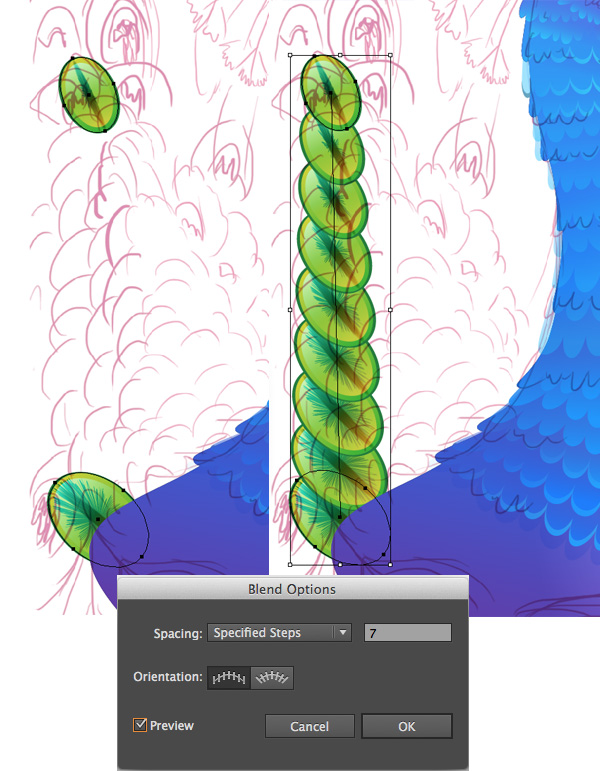
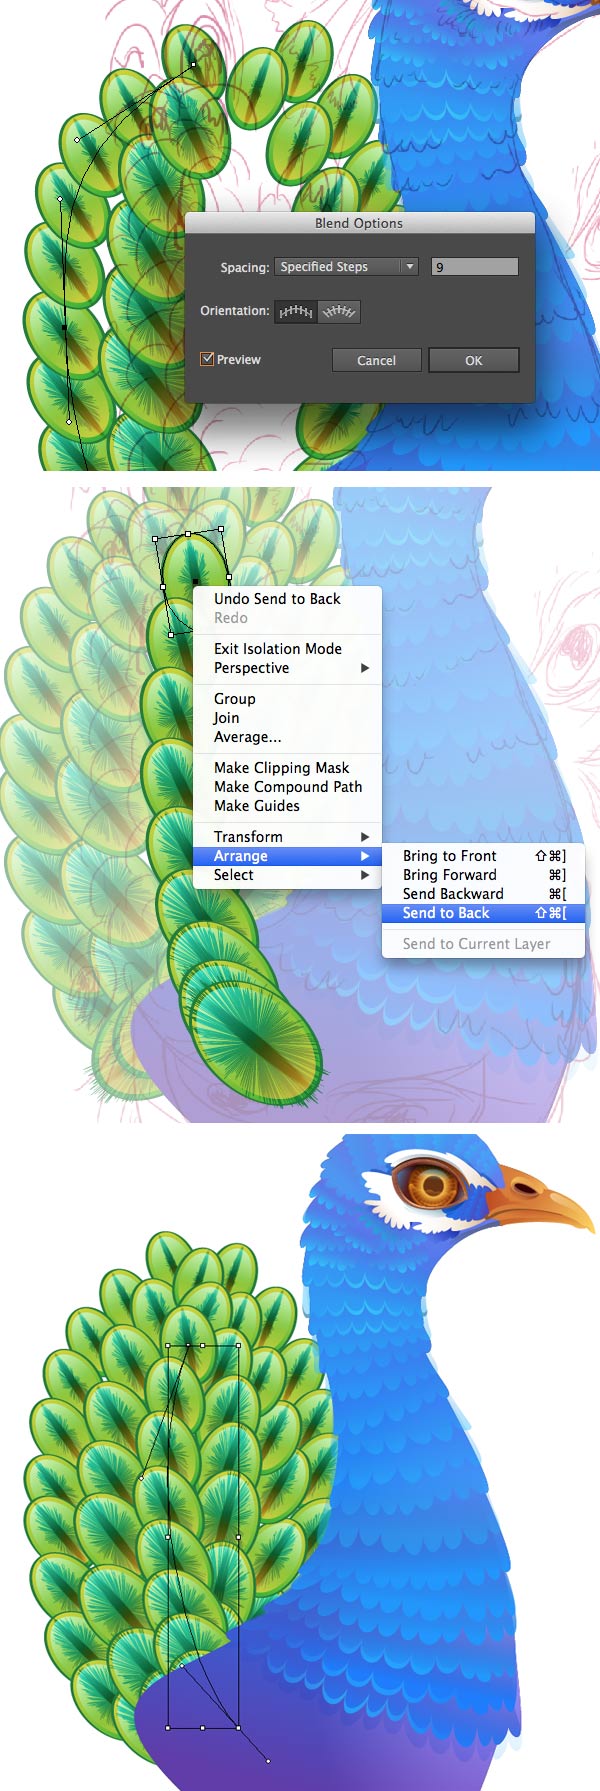
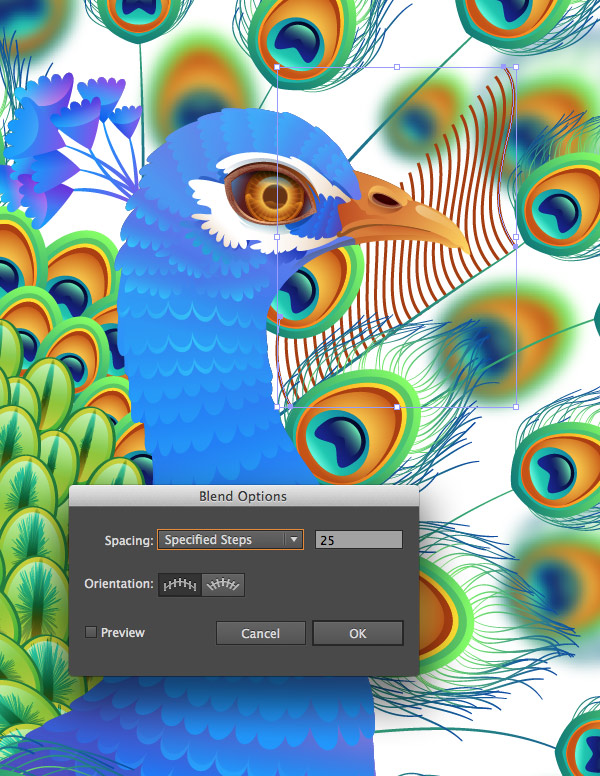
Now we need to form a tail. Place the created shape near the lower part of the peacock’s body. Put the second feather of a smaller size at some distance from the fist one, as shown on the screenshot.
Finally, select both elements and go to Object > Blend > Make. Use the Blend Options to set the Spacing to Specified Steps, value equals 7.
Step 5
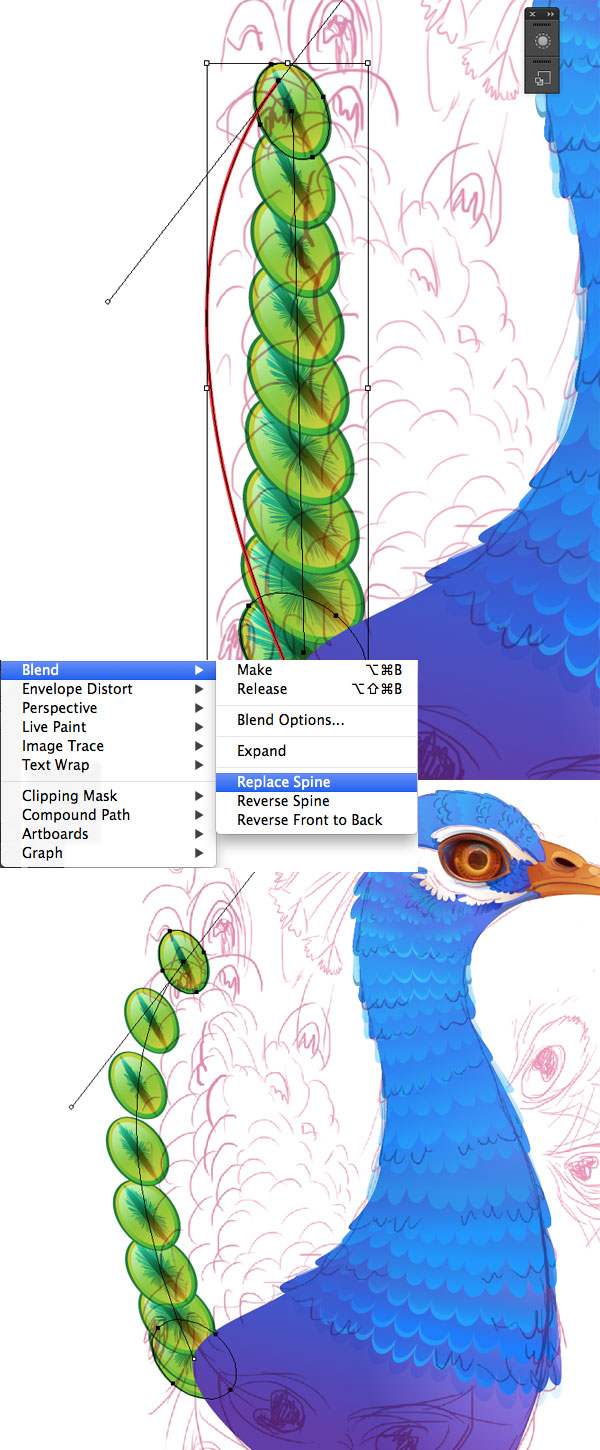
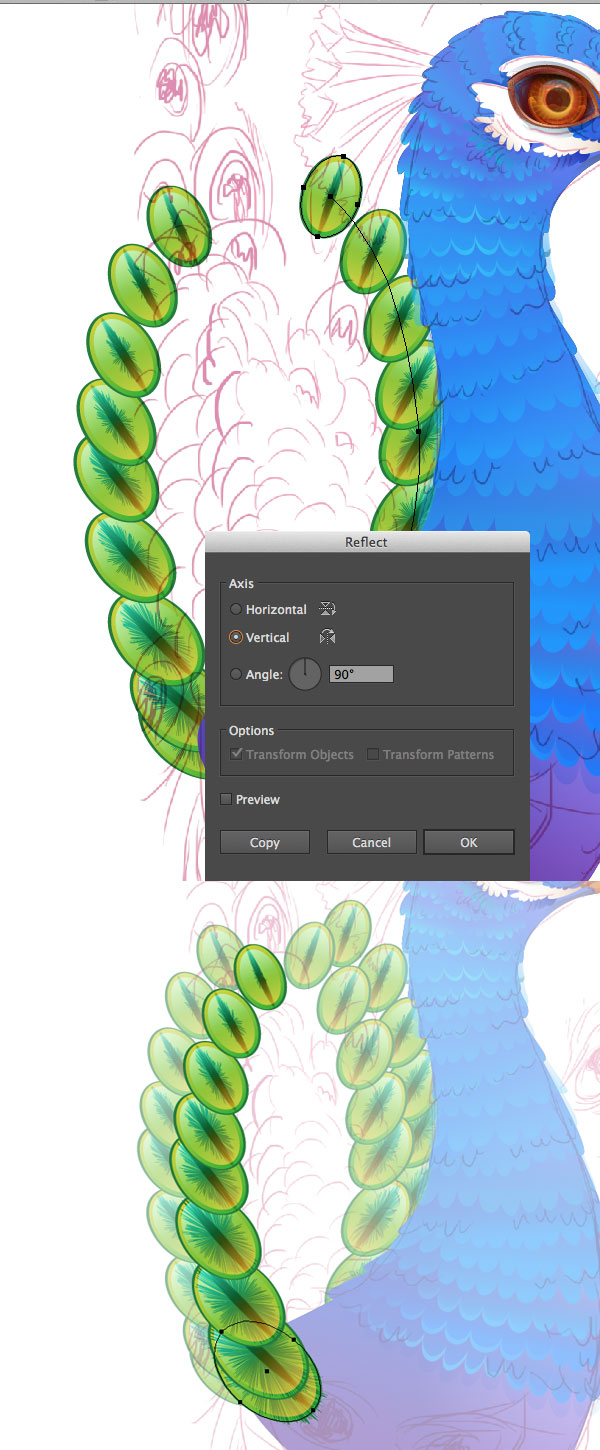
Now we need to make our tail nicely curved. Draw an arched line with the Pen Tool (P). Go to Object > Blend > Replace Spine so that the elements will align to the selected arc.
Step 6
Reflect the tail part over the vertical axis and continue adding new parts, making the tail more detailed.
Step 7
You can still change the Spacing value in the Blend Options and Rearrange any feather elements in the blend group, making the overall view more fancy and neat.
Step 8
Let’s move on and create the famous peacock's “eye”-feather!
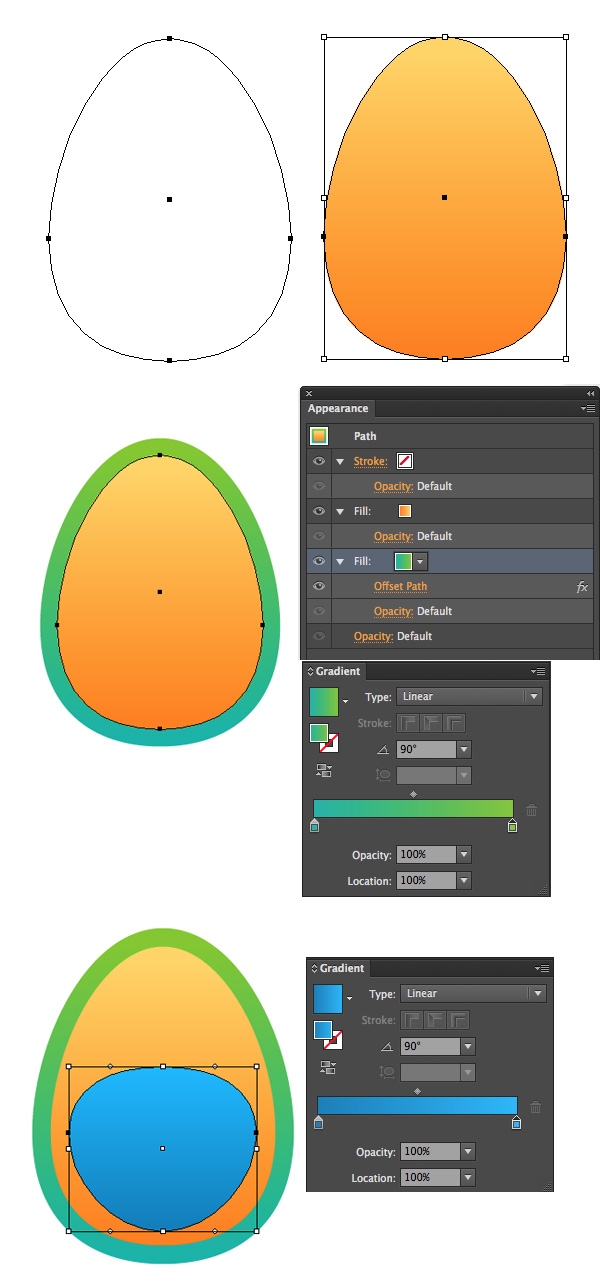
Start by forming and egg-shape out of the ellipse by moving its side anchor points down a bit. Fill the created shape with a gentle Linear Gradient from lighter orange on top to the darker orange in the bottom.
Use the Appearance panel to Add New Fill and apply the Offset Path effect, making it slightly larger than the basic shape. Take the Ellipse Tool (L) and form a new shape above, filling it with Linear Gradient of lighter and darker blue. Reshape the object, squashing it a bit, as show on the screenshot.
Step 9
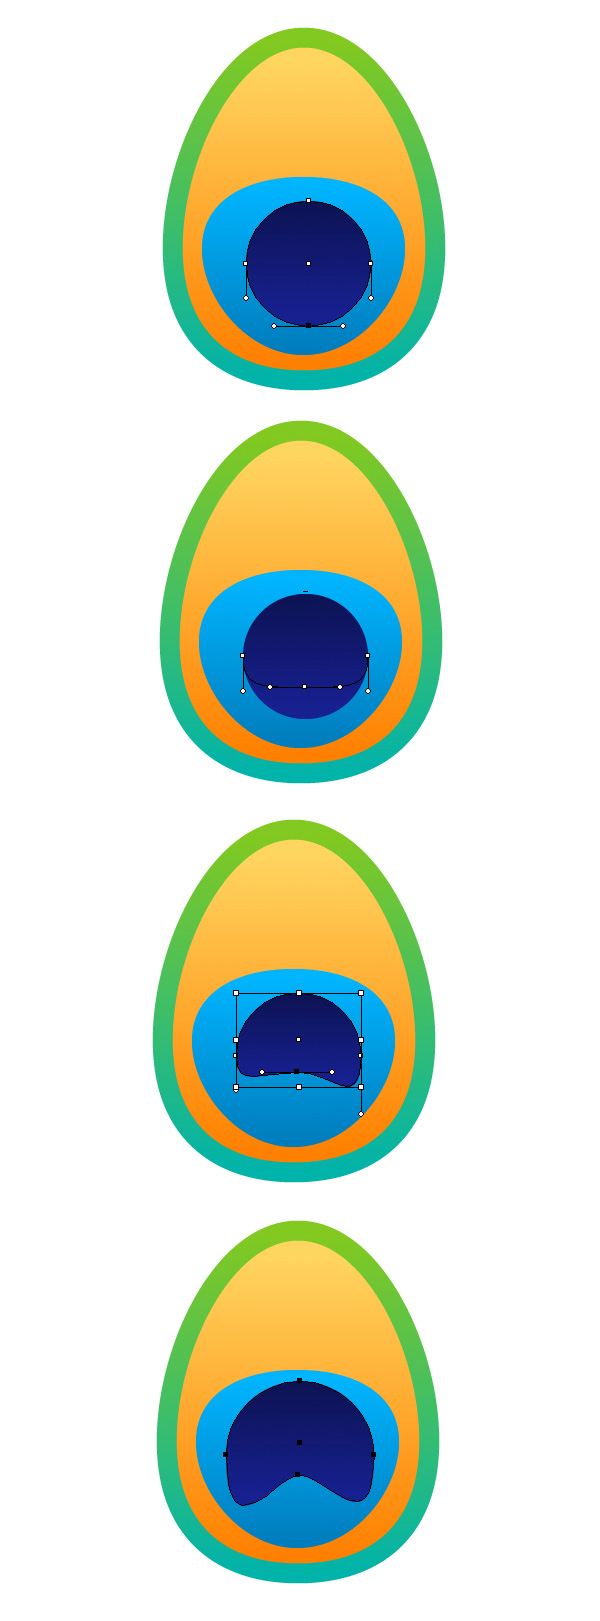
Put another circle on top, filling it with night blue. Use the Direct Selection Tool (A) for moving its anchor points and reshaping the circle into a new shape, reminding a hoof print.
Step 10
Go to Object > Expand Appearance in order to break the feather into separate elements. Select the green shape and convert its lower anchor point to corner, making it more pointed.
Apply a Radial Gradient to the yellow shape, making it shiny and golden. Add a glossy green spot above the dark blue shape and switch it to Blending Mode Screen.
Finally, make the object more detailed and whimsy by adding a few shadows and highlights at the edges of our feather.
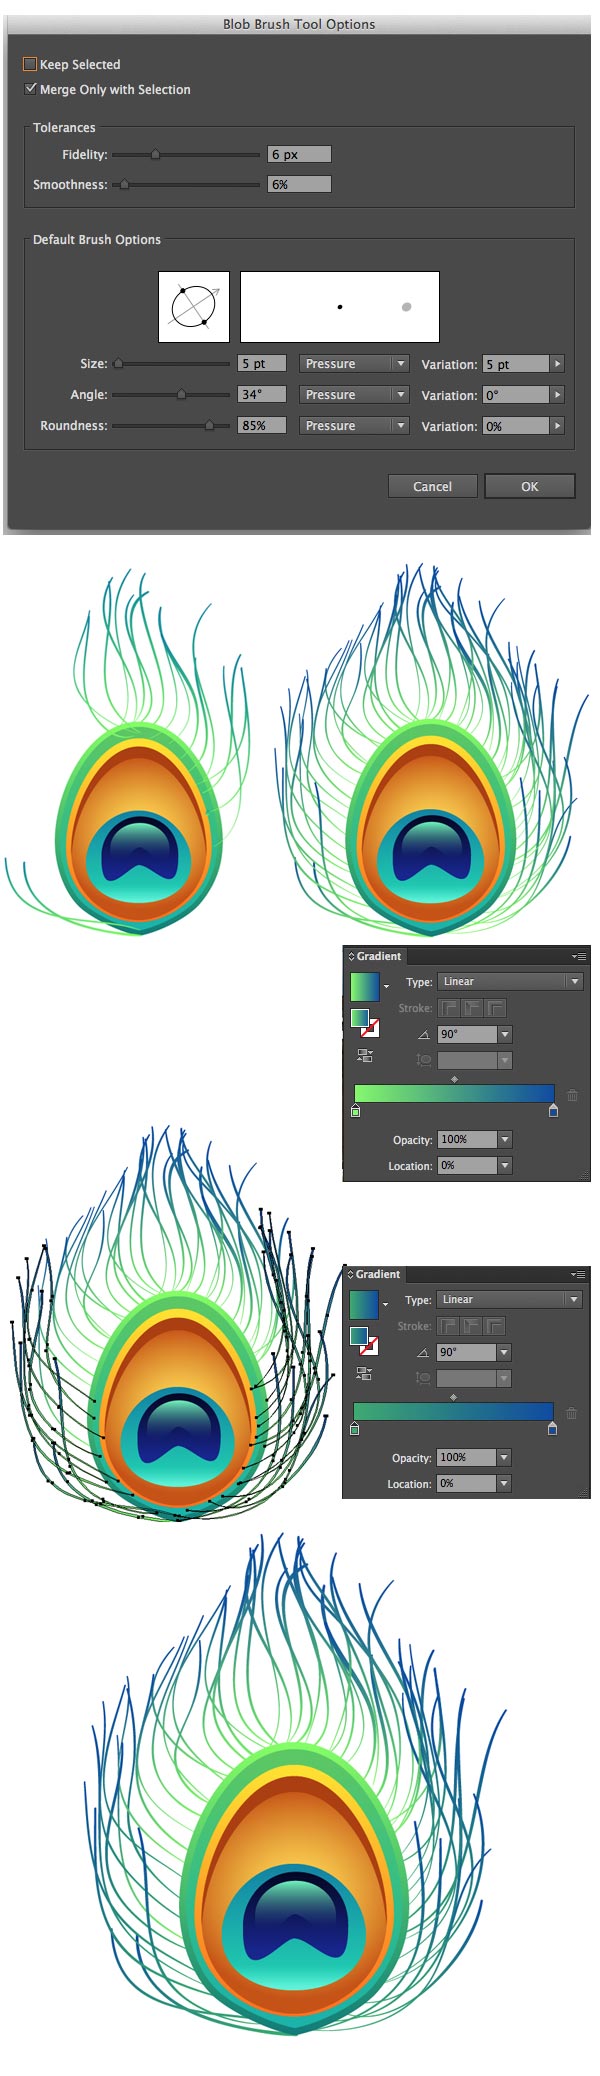
Step 11
Now grab the Blob Brush Tool (Shift-B) and start drawing out long hairlines around the feather. Apply a vivid green-blue gradient to the strokes. Put the hairlines behind our basic feather shape.
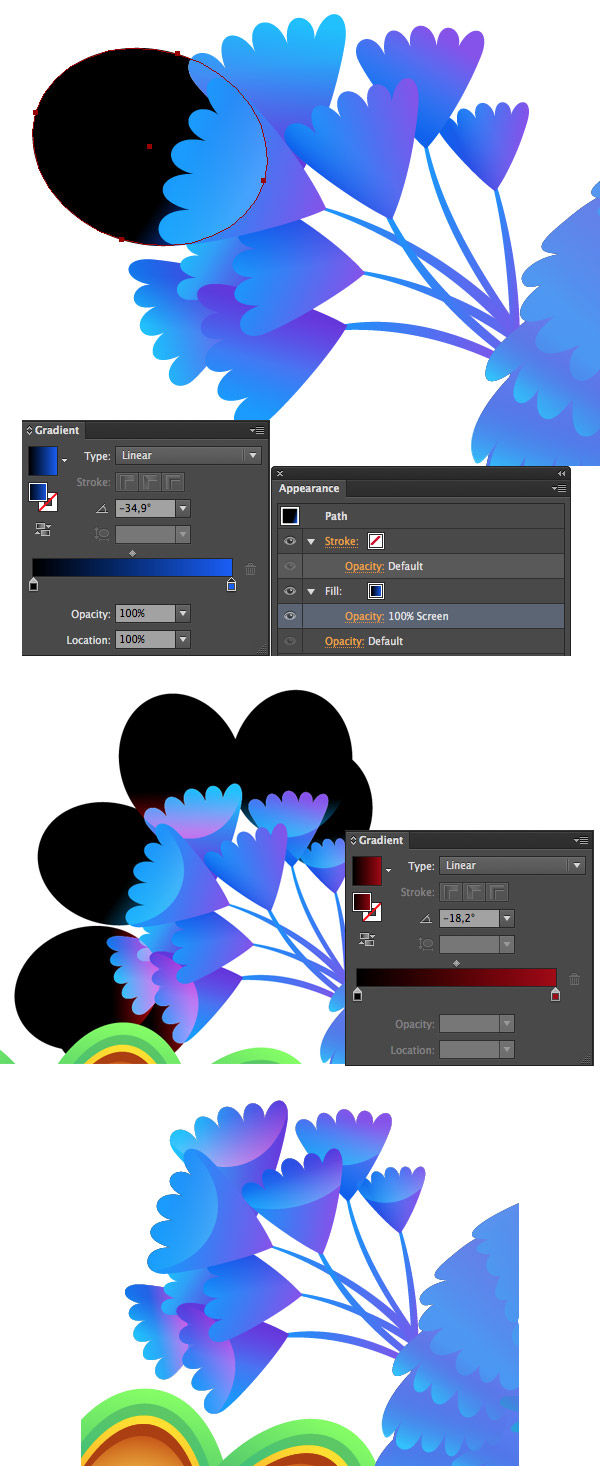
5. Render a Detailed Feather Filled Background
Step 1
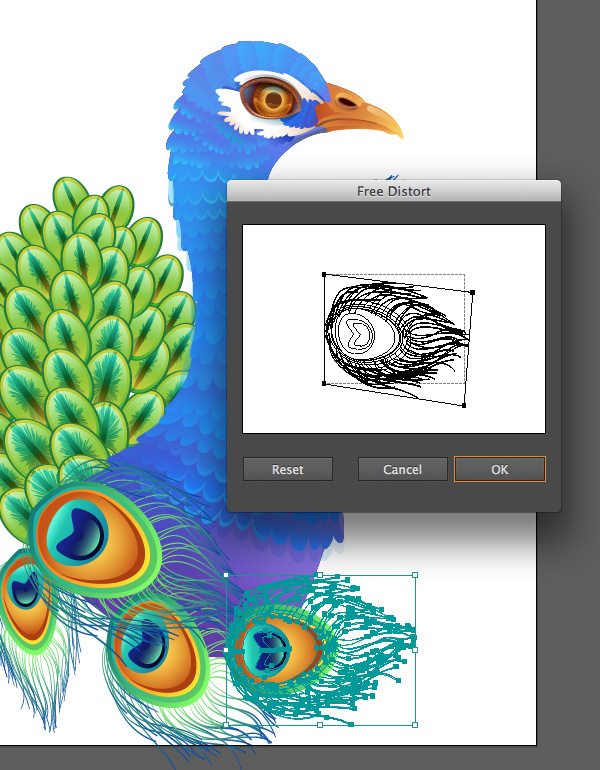
Now we can use the created feathers to make our picture more ornate. Put the biggest feathers above our peacock so that they cover the lower part of its body. Use the Effect > Distort & Transform > Free Distortfunction in order to change the perspective of some feathers, so that they fit into the composition nicely.
Step 2
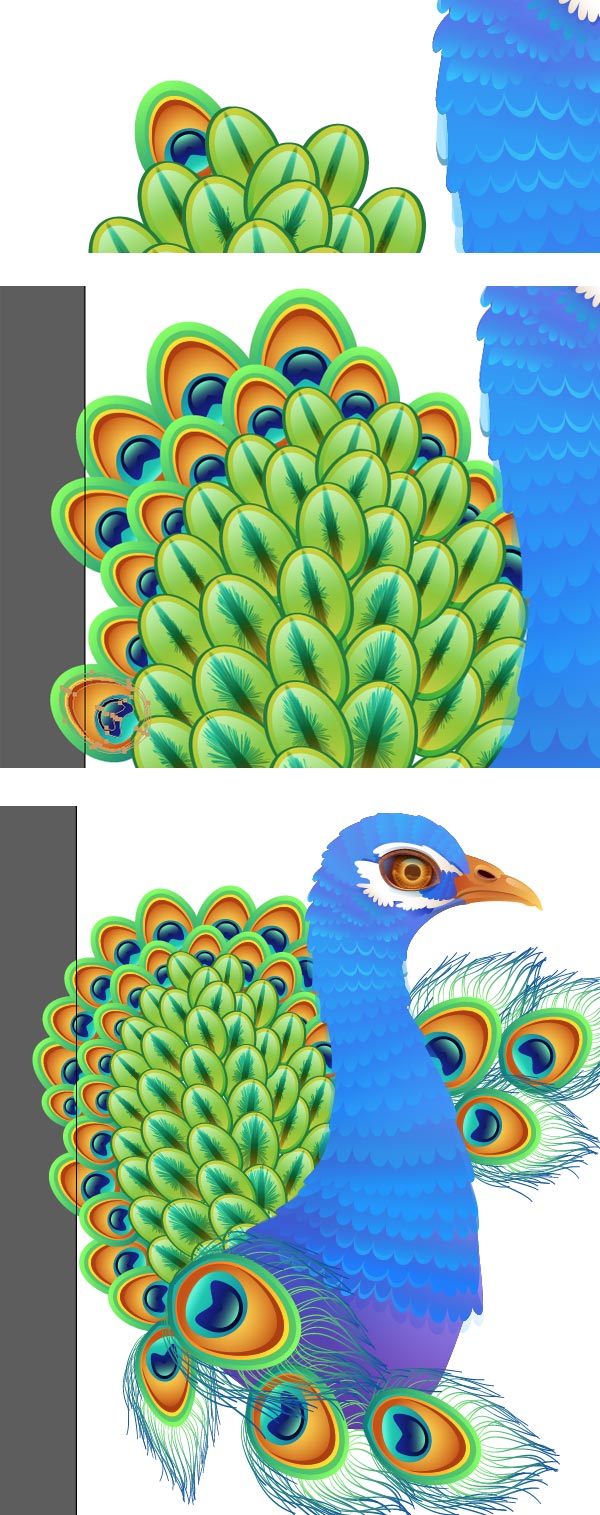
Continue filling up the picture, this time using the “eye”-feather base and putting its copies behind the green tail-feathers, making the tail more rich and decorated.
Step 3
Another distinctive peacock’s feature is a bunch of cute small feathers at the back of his head. Draw a few simple shapes using the Pencil Tool (N) and fill them with Linear Gradient from blue to lilac. Place one copy below the main shape and Add New Fill in the Appearance panel. Apply a Linear Gradient from lilac to white in the Blending Mode Screen in order to darken the shape and separate it from the upper element. Make more copies in order to create a fancy hairdo for our peacock.
Step 4
Make the feathers more shiny and fancy by putting an ellipse on each feather, filled with Linear Gradient from black to blue and to red. Switch the ellipses to Blending Mode Screen and delete the unneeded parts using the Shape Builder tool (Shift-M).
Step 6
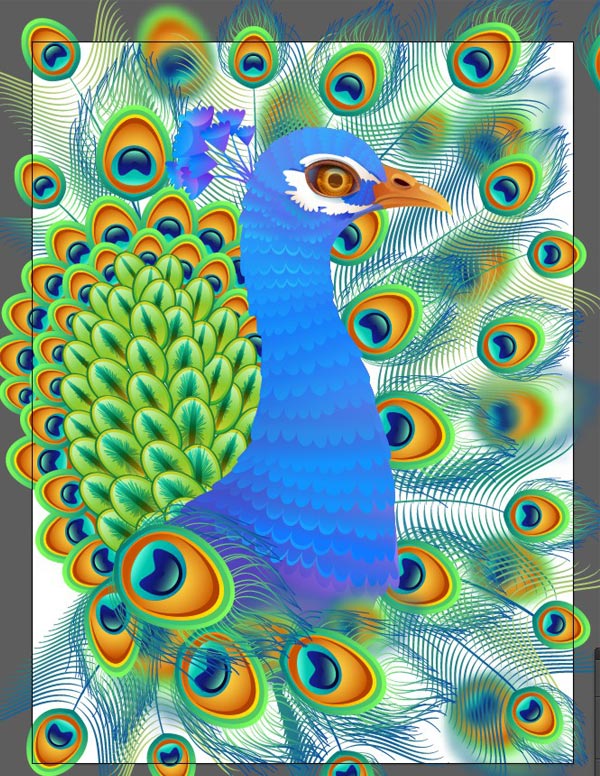
Put the created bunch of feathers on the peacock’s head and start filling the background with details.
Step 7
Add long feather shafts using the Blob Brush Tool (Shift-B).
Step 8
Let’s deepen the composition by selecting some of the feathers and applying the following effect: Effect > Blur > Gaussian Blur. Now it seems the blurred feathers are at farther distance from the viewer.
Step 9
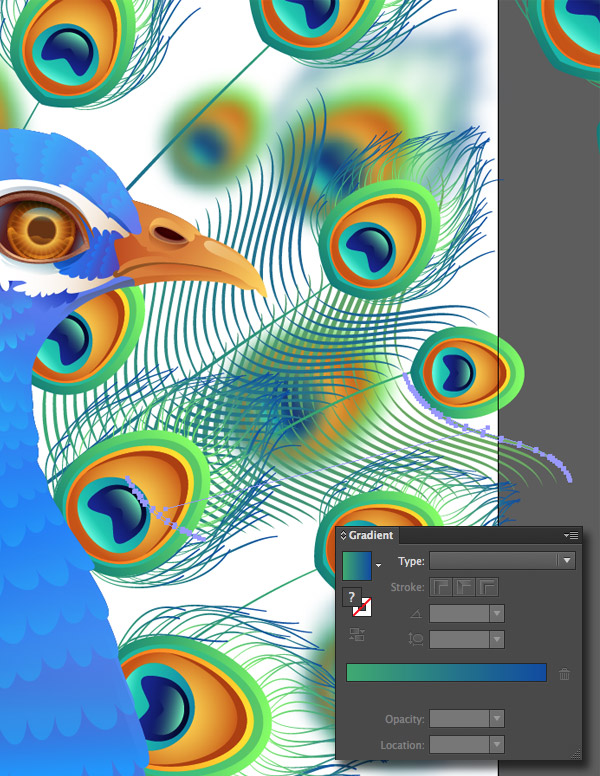
Draw a nice curved line with the Blob Brush Tool (Shift-B) and use the Blend Tool (W) to create a smooth feather. Use a gentle Linear Gradient from green to blue in order to fit the feathers into the overall color palette.
Step 10
Copy the created Blend group and place it on each feather shaft.
Step 11
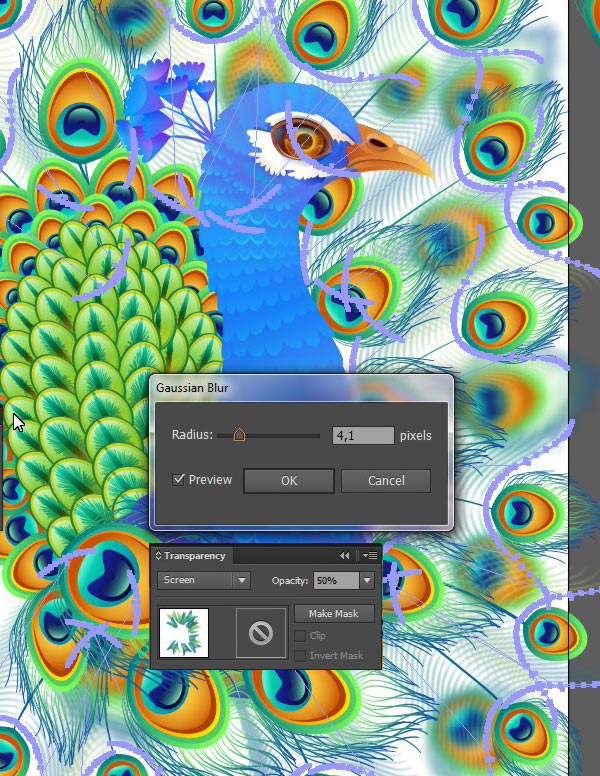
Apply a Gaussian Blur effect and Blending Mode Screen to the created hairlines in order to make them more soft and transparent.
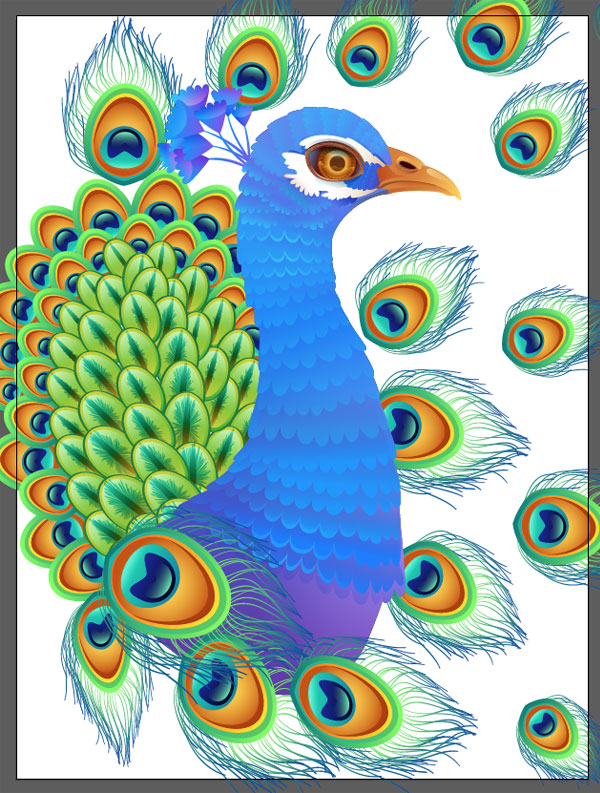
6. Add Minor Details to the Peacock and Background
Step 1
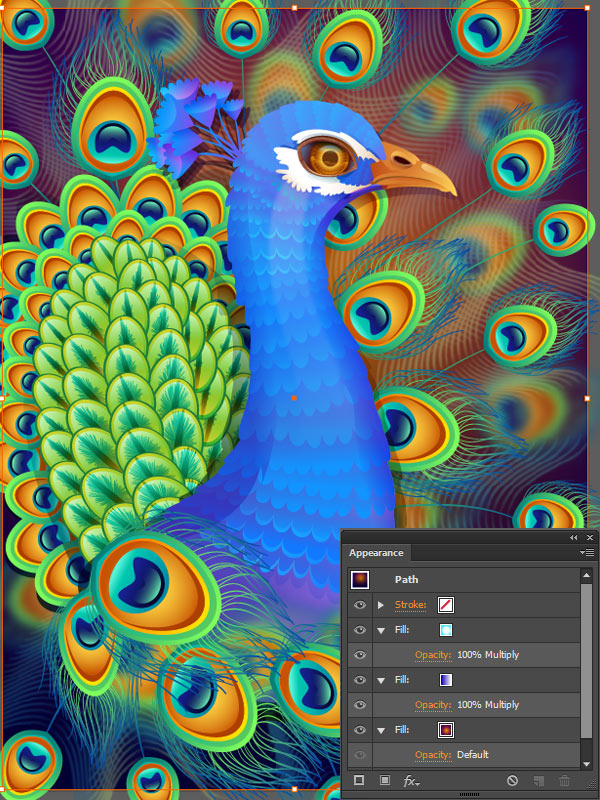
Now we need to add some shadows in order to emphasize the main object and to separate it from the background. Select all of the peacock’s parts and group them.
Step 2
Duplicate the selected group and Unite the objects in Pathfinder. Fill the newly created shape with Linear Gradient from dark-blue to white and switch it to Blending Mode Multiply in order to create a shadow from the peacock’s body.
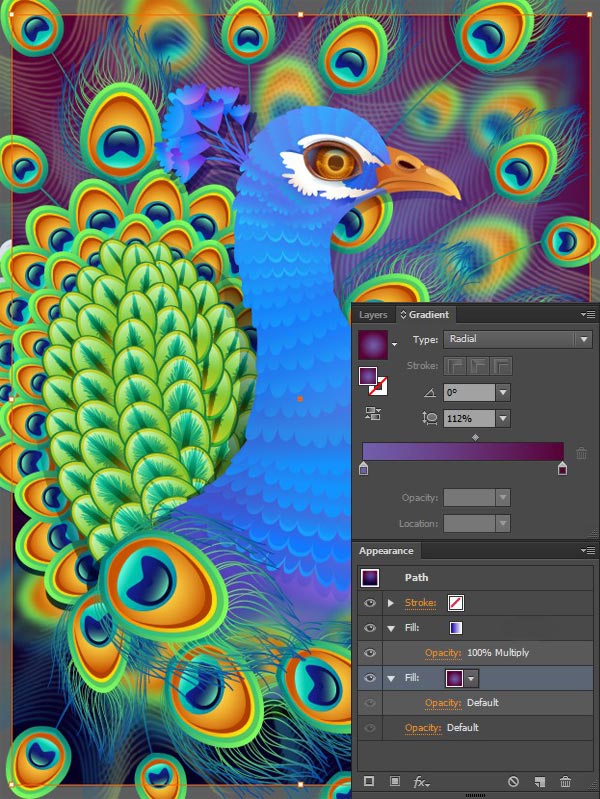
Step 3
It’s time to add some vivid color to the background! Create a rectangle of a size of our Artboard using the Rectangle Tool (M) and fill it with soft Radial Gradient from pale-lilac in the middle to dark violet at the edge. Use another fill to add a deep night-blue color in the bottom of the picture.
Step 4
Select the blurred feathers and make them more transparent.
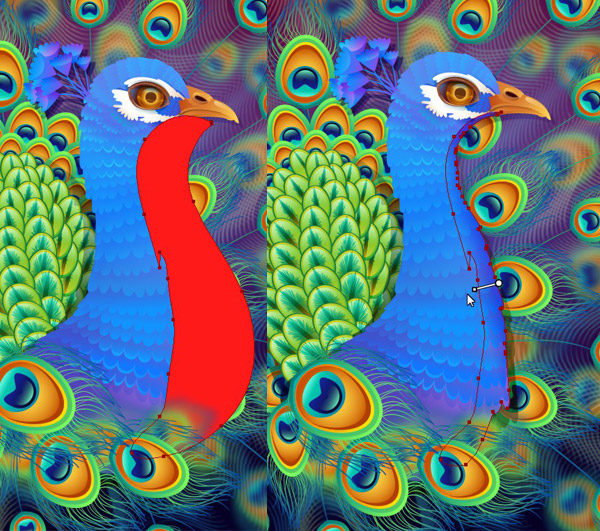
Step 5
Let’s add some finishing touches to our peacock and make him more dimensional. Draw a free shape that partly covers the bird’s chest. Delete the unneeded part with the Shape Builder Tool (Shift-M). Turn the newly created object into a shadow in order to smooth out the edge of the peacock’s body.
Use the same method to create a shadow on the opposite side of the body.
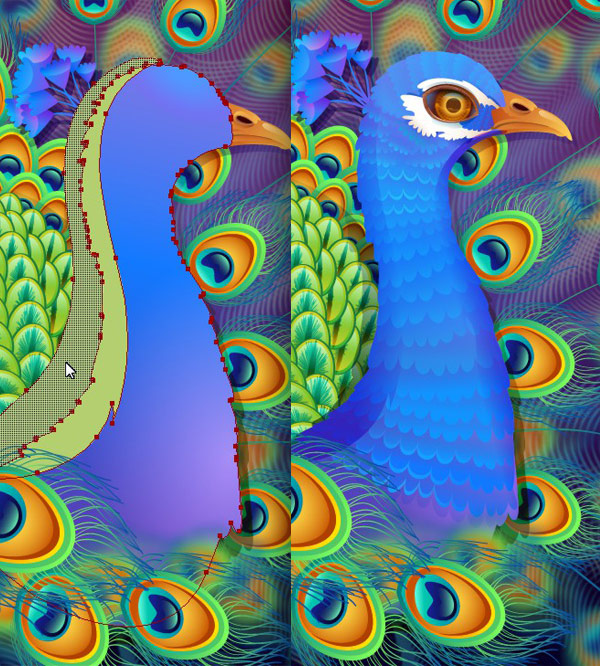
Step 6
Draw another curved drop-like shape in the center of the peacock’s body and fill it with Linear Gradient from black to greyish yellow.
Step 7
Switch the Blending Mode of the created object to Screen in order to make a bright highlight on the peacock’s feathers.
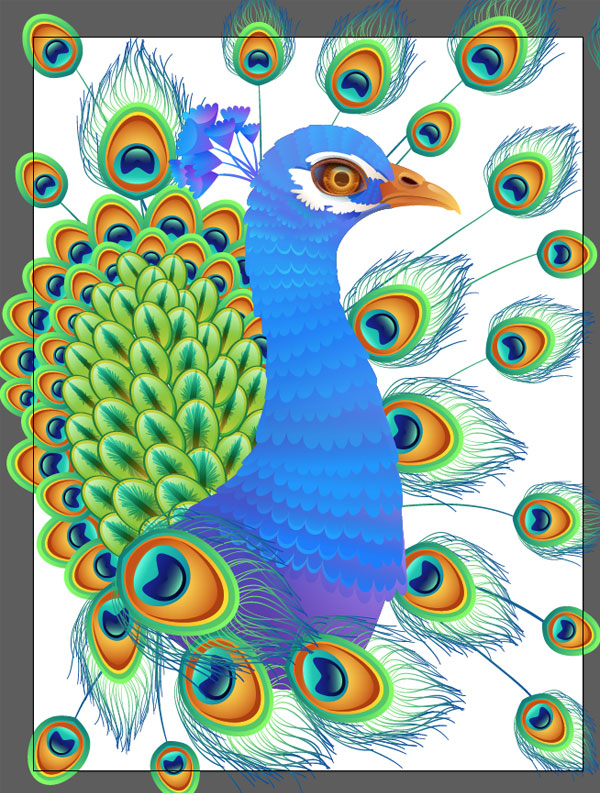
Step 8
Finally, observe the whole picture and add a few details here and there if you like. At this step I just add one more fill to the background – a radial gradient from blue on the edges to white in the center, switching it toBlending ModeMultiply, in order to make a nice vignette in the corners of the background.
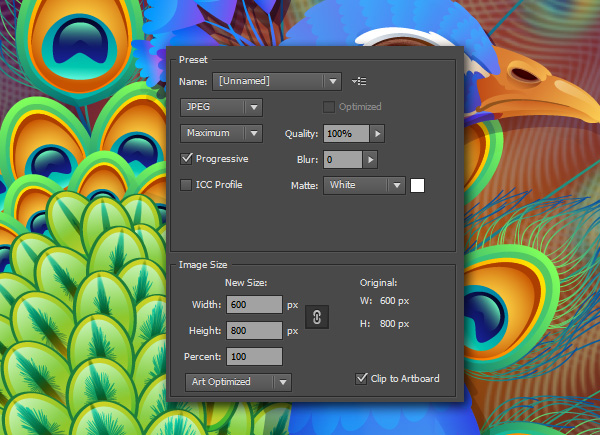
Step 9
When satisfied with the result, go to File > Save for Web (Alt-Shift-Control-S) and export your artwork. Don’t forget to check the Clip to Artboard box, so that the unneeded elements outside your Artboard won’t be included into the composition.
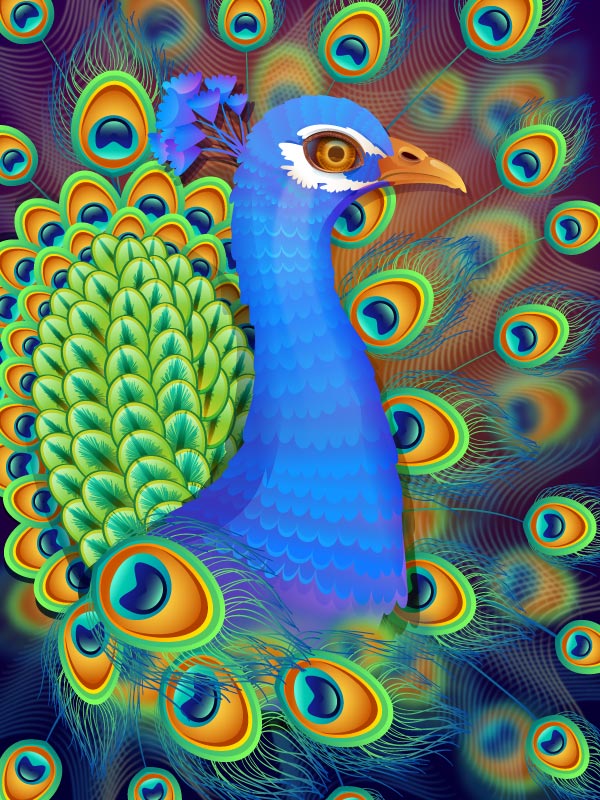
Voila! You’ve Finished Portraying the Glorious Peacock!
Good work! I hope you’ve assured in the convenience and advantages of the Appearance panel and found some useful tips and tricks in this tutorial! Have fun and never stop creating!


 Step 7